


Size Marine Battery Chargers 10–20%: Calculator Ready Boat Amp Targets
For most boat battery banks, size the shore charger to roughly 10 to 20% of the bank’s amp hour capacity, and lean toward the higher end for LiFePO4 if the battery management system and shore power circuit allow it. Every bank on a multi-bank boat needs its own sizing math, and wiring, heat, and connector losses will always cut into the amps the charger actually delivers. The formulas and worked examples below let you land on a number you can verify with an installer or use to order the right unit.
TL;DR:
- Proper charger sizing depends on the bank’s amp hour capacity, chemistry, acceptance factor, and additional losses, with lithium banks often accepting higher currents.
- Multi-bank systems require independent, correctly rated chargers for each bank type to prevent unbalanced charging and damage, especially for series-connected packs.
- Wiring length, conductor gauge, and compartment ventilation significantly impact the actual delivered current and overall charger effectiveness.
- Chargers must match the battery chemistry’s specific charging profile, with lead-acid requiring multi-stage profiles and lithium needing configurable, chemistry-specific settings.
- Safety features such as reverse polarity protection, overcharge cutoff, and marine-certified enclosures are essential for reliable, durable installation in saltwater environments.
Table of Contents
- How Do You Size a Marine Battery Charger by Bank Capacity?
- How Do You Size Chargers on Multi-Bank Boats?
- Why Do Trolling Packs Need Multi-Voltage Chargers?
- How Much Does Wiring and Heat Cut Into Charger Output?
- Which Charging Profile Does Your Battery Chemistry Need?
- Worked Examples: Calculating Charger Size and Charge Time
- What Installation and Certification Details Matter Most?
- Why Trust Experts on Charger Sizing?
- Considerations for AGM, Gel, and Flooded Lead Acid Charging
- How Charger Quality Affects Sizing and Battery Health
- Safety Features and Compliance Standards to Look For
- An Installer’s Take on Common Sizing Mistakes
- Get the Right Charger and Battery Pairing for Your Boat
- Sources
How Do You Size a Marine Battery Charger by Bank Capacity?
Charger sizing starts with a single variable most guides skip past too fast: acceptance factor. That’s the percentage of a battery’s amp hour capacity it can safely absorb during bulk charging without overheating the plates or, for lithium, tripping the BMS.
Different chemistries accept current at very different rates. Flooded lead acid batteries tolerate roughly 10 to 15% of their Ah rating. AGM batteries run higher, typically 15 to 25%. LiFePO4 is the outlier: depending on the battery’s BMS and the charger’s output limits, lithium banks can often accept anywhere from 30% up to 100% of their rated Ah.
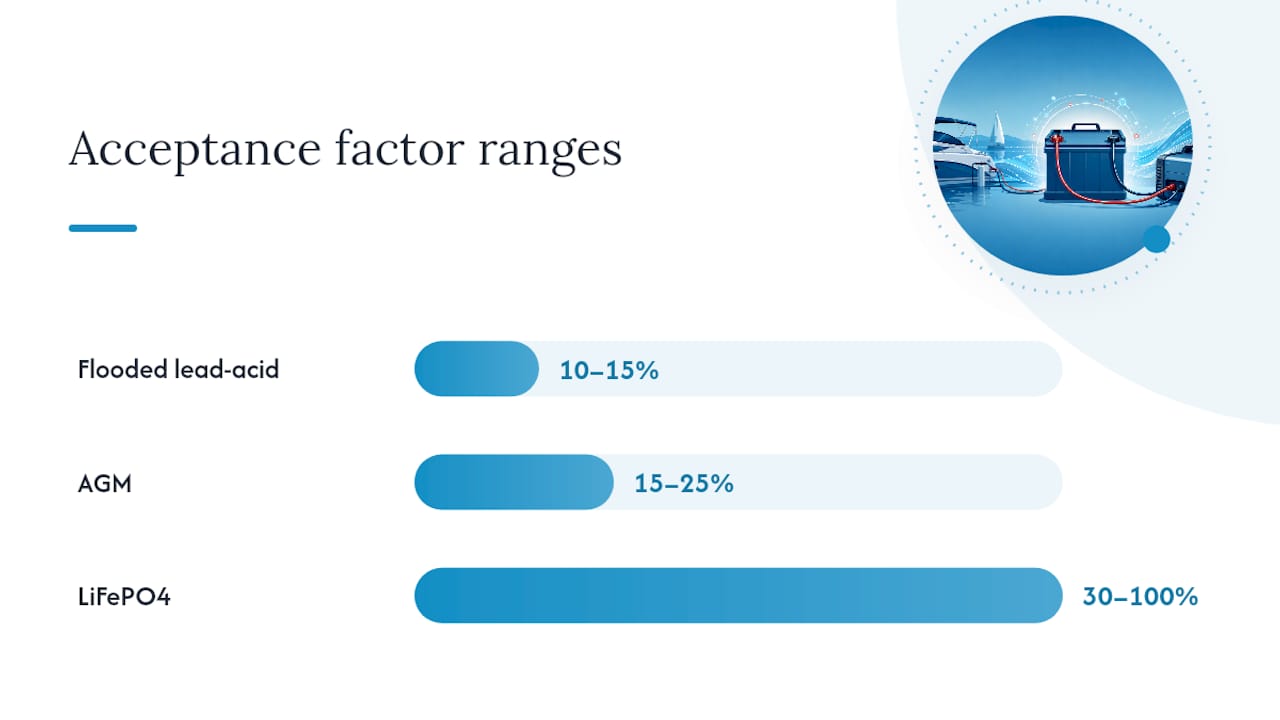
The formula is simple:
Recommended charger amps = Bank Ah × Acceptance Factor
So a 200Ah AGM house bank at a 20% acceptance factor calls for a 40A charger. A 200Ah LiFePO4 bank at 50% acceptance, assuming the BMS and shore circuit both support it, could justify a 100A unit.
That number is your target delivered current, not necessarily the charger’s rated output. Add roughly 15% back in for conversion losses inside the charger itself, so a 40A delivery target often means shopping for a charger rated closer to 46 or 47A.
A few practical guardrails:
- Below 10% of Ah, charging gets slow enough that you may never top off a deep-cycle bank between trips.
- Above 25% on flooded or AGM batteries, you risk plate stress, gassing, and shortened service life.
- On LiFePO4, always check the BMS max charge current before buying a fast charger. A big charger paired with a small BMS limit just wastes money and throttles down anyway.
How Do You Size Chargers on Multi-Bank Boats?
A boat with a starter battery, a house bank, and a bow thruster isn’t one sizing problem. It’s three, and treating them as one is the most common mistake owners make when shopping for a charger.
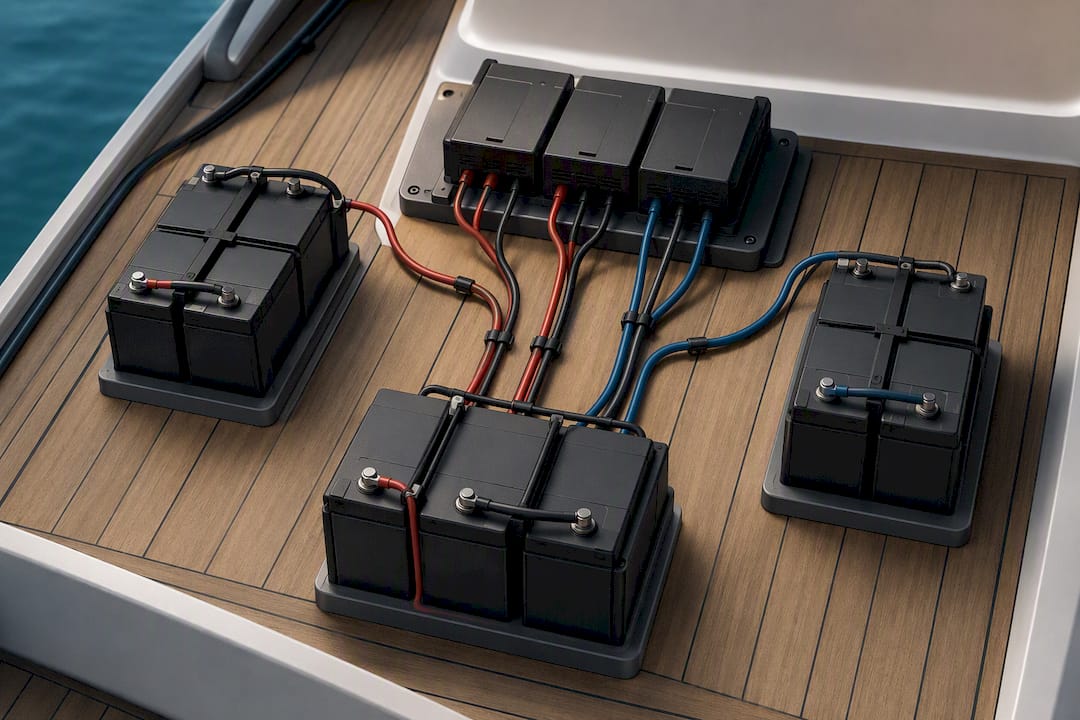
Each bank has a different job and a different charge profile it wants. The starter battery sits at high state of charge most of the time and needs a shallow top-off, not a full bulk cycle. The house bank cycles deep and needs real capacity. A thruster bank sees short, violent bursts of draw and long idle periods between uses.
That’s why multi-output chargers exist as isolated, independently managed outputs rather than one output split with a diode isolator. Match the output count to the bank count:
- Two banks (starter + house): a 2-bank charger with independent outputs.
- Three banks (starter + house + thruster): a 3-bank charger, or a 2-bank unit plus a dedicated maintainer on the thruster.
- Series propulsion or trolling packs: a separate, purpose-built charger at the pack’s actual voltage, never a generic multi-bank 12V unit.
Why Do Trolling Packs Need Multi-Voltage Chargers?
Most boats run 12V. Bigger house banks sometimes step up to 24V. Trolling motors and some electric propulsion systems push into 36V and 48V territory, and that’s where sizing mistakes get expensive.
These higher voltages are built from series-connected 12V batteries, and that changes the charging rules entirely. Hook up three separate 12V chargers to a 36V series string, thinking you’re “charging each battery,” and you’re not. You’re creating three uncoordinated charge cycles on batteries that are electrically tied together, and the packs will drift out of balance fast.
The failure mode is real: one battery in the string ends up overcharged while another lags behind undercharged, and repeated cycles like this shorten pack life significantly. Independent 12V chargers on a series string simply fight each other.
The fix is a charger built for the pack’s actual nominal voltage, or a synchronized multi-output system engineered specifically for series strings. Rough guidance by voltage class:
- 12V: standard for starter batteries, small house banks, most accessories.
- 24V: common on larger house banks and some trolling setups.
- 36V: typical for mid-size trolling motor packs, requires a true 36V charger.
- 48V: increasingly common for electric propulsion and larger LiFePO4 packs, same rule applies.
Buy the charger rated for the pack’s nominal voltage, full stop. Don’t improvise with multiple smaller units.
How Much Does Wiring and Heat Cut Into Charger Output?
A charger’s rated output and its delivered output are two different numbers, and the gap between them is almost always wiring, heat, or both.
Voltage drop is the quiet killer here. Every foot of undersized cable between the charger and the battery bank sheds a little voltage, and that drop shows up as reduced charging current, not as a fault code. The fix is measuring where it counts: put a meter directly on the battery terminals while charging, not at the charger’s output leads, since that’s the only place that tells you what the battery is actually receiving.
Pro Tip: If terminal voltage reads noticeably lower than the charger’s rated output voltage under load, don’t assume the charger is bad. Check the cable gauge and run length first. Most “weak charger” complaints turn out to be a wiring problem.
For a 12V system aiming to stay under roughly 3% voltage drop, rough conductor guidance looks like this:
- 6 AWG for runs up to about 10 feet at 30A.
- 4 AWG for runs up to about 15 feet in the 30 to 50A range.
- Larger gauge, or a shorter run by relocating the charger, for anything beyond that.
Heat matters just as much. Chargers mounted in tight, unventilated compartments throttle their own output as internal temperatures climb, and DC-DC units especially dissipate real heat under load. If your engine bay or battery locker runs hot, plan for ventilation or accept a lower effective output than the spec sheet promises.
Which Charging Profile Does Your Battery Chemistry Need?
Sizing the amperage is half the job. Matching the charge profile to the chemistry is the other half, and getting it wrong can quietly ruin an otherwise correctly sized charger’s usefulness.
Lead-acid batteries, whether flooded, AGM, or gel, want a three-stage bulk, absorption, and float profile. Bulk delivers maximum current until the battery nears full charge, absorption holds voltage steady while current tapers, and float maintains a low trickle to offset self-discharge without overcharging.
LiFePO4 wants something different. There’s effectively no long float stage since lithium chemistry doesn’t need trickle maintenance the way lead-acid does, and the absorption setpoint needs to match the specific pack’s chemistry accurately rather than approximating it. A lithium-specific or user-configurable profile matters more here than raw amperage.
If your boat runs mixed chemistries, say a lead-acid starter alongside a lithium house bank, look for a charger with:
- Independently configurable outputs per bank, not a single shared profile.
- A dedicated lithium setpoint rather than a generic “deep cycle” mode repurposed for LiFePO4.
- Marine-rated enclosure construction suited to the installation environment, in line with ABYC expectations for onboard electrical equipment.
Planning a lithium retrofit down the road? Buying a charger with lithium profile support now saves a second purchase later. Our LiFePO4 marine battery guide covers what a charger needs to support before you upgrade.
Worked Examples: Calculating Charger Size and Charge Time
Numbers land better than rules of thumb.
- Small runabout, 150Ah AGM house bank. At a 20% acceptance factor: 150 × 0.20 = 30A delivered target. Add the 15% loss factor: 30 × 1.15 ≈ 35A charger rating to shop for.
- Cruiser, 350Ah house bank (12V or 24V). At a 20% acceptance factor: 350 × 0.20 = 70A delivered. With the loss factor: 70 × 1.15 ≈ 80A charger rating.
- 36V trolling pack, 100Ah per battery in series. LiFePO4 at 30% acceptance: 100 × 0.30 = 30A delivered, needing a true 36V charger rated near 35A after the loss factor.
Estimating recovery time from a partial discharge uses a related formula: Ah to replace ÷ net charger amps × 1.15. At 80A delivered: 140 ÷ 80 × 1.15 ≈ 2 hours.
Run your own numbers with this checklist:
- Confirm each bank’s Ah rating and chemistry.
- Apply the acceptance factor for that chemistry.
- Multiply by 1.15 for the loss factor to get a target charger rating.
- Check BMS max current (lithium) or plate limits (lead-acid) against that number.
- Verify shore power or genset capacity can actually deliver it.
What Installation and Certification Details Matter Most?
A correctly sized charger installed poorly still underperforms. ABYC’s E-11 wiring standard and A-31 charger mounting guidance exist specifically because marine electrical failures tend to come from installation shortcuts, not equipment defects.
Fuse the charger’s output close to the battery, size conductors for the full rated current, and confirm your shore power breaker can handle the charger’s AC draw alongside everything else running on that circuit. An IP rating alone doesn’t guarantee marine durability. Salt mist and constant vibration break down connections that a dry-land IP67 rating never accounted for, which is why marine-rated mounting hardware and corrosion-resistant terminals matter as much as the enclosure spec. The same logic applies to hull and hardware protection generally. Marine-grade coatings exist for the same reason: dry-land ratings rarely survive salt exposure unchanged.
Quick install checklist: ventilate the charger compartment, fuse close to the battery, size conductors for full rated amperage, and measure terminal voltage after installation to confirm delivery.
Why Trust Experts on Charger Sizing?
Experienced manufacturers of AGM and lithium batteries for powersports and marine use often back their products with multi-year warranties. That kind of warranty commitment only makes sense when a company understands how batteries actually fail in the field, including improper charger sizing.
Before reaching out to support, have your bank’s Ah rating, chemistry, number of banks, and AC shore input on hand. It cuts the back and forth to one conversation.
Considerations for AGM, Gel, and Flooded Lead Acid Charging
LiFePO4 gets most of the attention in sizing conversations, but AGM, gel, and flooded lead acid still make up the majority of marine battery banks on the water, and each has its own quirks worth knowing.
AGM batteries tolerate a higher charge rate than flooded batteries because the sealed design resists the gassing that plagues open-cell lead-acid under fast charging. Push a flooded battery too hard, though, and you’ll boil electrolyte and shorten its life fast. That’s the practical reason flooded batteries sit at the low end of the acceptance factor range while AGM sits higher.
Gel batteries are the pickiest of the three. They demand a lower absorption voltage than AGM or flooded, and running a gel battery on a charger profile meant for AGM will overcharge it steadily over time, even though the amperage might look correct on paper. If your charger doesn’t have a dedicated gel setting, don’t assume “AGM mode” is close enough.
Flooded batteries also need periodic equalization charging, a controlled overcharge that stirs the electrolyte and reverses stratification. AGM and gel batteries should never see an equalization cycle. A charger that applies one blindly across chemistries, or a multi-bank charger with only one shared profile, can quietly damage whichever bank wasn’t designed for that stage.
The takeaway: chemistry-specific profile support isn’t a lithium-only concern. Mixed lead-acid fleets on the same boat need the same attention to matched profiles that a lead-acid and lithium mix does.
How Charger Quality Affects Sizing and Battery Health
Two chargers with identical amperage ratings can produce very different results on the same battery bank, and the difference usually comes down to features that never show up in the headline spec.
Multi-stage charging is the baseline. A charger stuck on a single bulk-only output will overcharge a battery that’s already near full, since it can’t taper current the way a proper bulk-absorption-float cycle does. That shortens battery life regardless of how well the initial sizing math was done.
Temperature compensation matters more than most owners realize. Battery chemistry accepts charge differently at 40 degrees Fahrenheit versus 95 degrees. A charger with a temperature sensor on the battery adjusts its charge voltage accordingly. Without it, a charger tuned for moderate temperatures will undercharge in the cold and risk overcharging in the heat, even while running the exact amperage the sizing formula recommended.
Higher-quality chargers also tend to hold tighter voltage regulation, which matters most on sensitive lithium banks where a BMS may cut off charging entirely if voltage spikes past its programmed limit. A cheaper charger with looser regulation can trip that cutoff repeatedly, leaving the bank chronically undercharged even though the amperage on paper looks correct.
None of this changes the sizing formula. It changes whether the charger you sized correctly actually delivers a full, healthy charge cycle over hundreds of uses instead of degrading the bank early.
Safety Features and Compliance Standards to Look For
A charger that’s sized correctly but lacks basic safety protections is still a liability sitting next to a battery bank soaked in salt air and engine vibration.
Look for reverse polarity protection, which prevents damage if the leads get connected backward, along with short circuit protection and overcharge cutoff that stops the charging cycle once the battery reaches full rather than continuing to push current. These aren’t premium extras. They’re baseline expectations for any charger rated for marine use.
Spark-proof or ignition-protected design matters specifically in marine settings because battery compartments can accumulate hydrogen gas during charging, and an unprotected charger becomes an ignition source in exactly the wrong environment. This is one area where a charger built for automotive use and one built for marine use genuinely differ, even if the amperage specs look identical on a spec sheet.
Compliance markers worth checking include UL marine listing and construction that aligns with ABYC electrical standards for onboard equipment. These standards exist because marine electrical fires and battery failures follow predictable patterns tied to installation and equipment shortcuts, not random bad luck.
None of these features change the amperage math from earlier sections. They determine whether the correctly sized charger operates safely for years in a wet, vibrating, salt-exposed compartment instead of becoming a failure point itself.
An Installer’s Take on Common Sizing Mistakes
Size every bank on its own math, respect the BMS limit before chasing amperage, and never assume one charger output serves two banks well. Most sizing failures I see trace back to wiring, not the charger spec. For anything beyond a simple single-bank setup, get a second opinion from an installer before you order.
— Donald
Get the Right Charger and Battery Pairing for Your Boat
Bansheebatteries builds LiFePO4 and AGM marine batteries designed to work with the sizing rules covered here, and the lithium marine battery collection is where most owners upgrading a house bank start. Unlike shopping blind through a generic marine supply catalog, you’re working with a company that backs every battery with a 5-year lithium or 4-year AGM warranty, so the sizing math you just ran actually holds up over years of use, not just the first season.
Before you order a charger, pull together your bank’s Ah rating, chemistry, bank count, and AC input capacity. That’s the information our team needs to point you toward a compatible battery and charger pairing rather than a generic recommendation. Browse the full marine batteries lineup to see AGM and lithium options side by side, or check a lower-amp maintainer like the 10A automatic charger if you’re maintaining a smaller secondary bank rather than fast-charging a primary house battery. Reach out with your specs, and we’ll help you land on the right pairing the first time.
Sources
Shore power charging rarely tells the whole story for boats that spend real time away from the dock. Solar panels, alternators, and DC-DC chargers all add current to the same bank, and sizing decisions need to account for all of them together, not just the shore charger in isolation.
Splitting charging across multiple sources rather than relying on one to do everything tends to produce better results and faster recovery. A shore charger handles dockside top-offs. An alternator or DC-DC charger handles underway charging from the engine. Solar handles slow, steady maintenance charging at anchor or in storage.
For DC-DC chargers feeding a meaningful lithium bank, size them in the 50 to 100A range if they’ll be a primary charging source rather than a backup. Our charging system types guide breaks down where each source fits best for different boat use patterns.
Solar sizing follows its own math tied to panel wattage and sun hours rather than the acceptance-factor formulas used for shore chargers, but the same chemistry rules apply. A lithium bank still needs a solar controller with a lithium-appropriate charge profile, and a lead-acid bank still needs three-stage regulation from whatever source is feeding it. Stack multiple sources without checking their combined output against the bank’s total safe acceptance rate, and you risk exceeding what the battery, or the BMS, was ever designed to handle.
- Marine Battery Charger Selection Guide 2026: 12V / 24V / 36V / 48V On-Board Multi-Bank Chargers (ABYC, IP67, Lithium-Compatible)
- Battery Charger Size Calculator: #1 Best ABYC Tool
- A Guide to Marine Battery Charging