


Solar Battery Charging Explained for Home and Small Systems
Solar battery charging is the controlled, multi-stage process by which a charge controller draws current from solar panels and delivers it to a battery in regulated phases, protecting the battery from overcharging and extending its service life. Every functional solar storage system relies on four core components: solar panels (the energy source), a charge controller (the regulator), a battery (the storage medium), and, when you need AC power, an inverter.
The charging process moves through up to four stages:
- Bulk — maximum current delivered until the battery reaches a high state of charge (SOC)
- Absorption — constant voltage held while current tapers, bringing SOC close to full charge
- Float — a lower maintenance voltage that keeps the battery topped without overcharging
- Equalization — a periodic high-voltage pulse used only for flooded lead-acid batteries
Solar panels should never connect directly to most batteries without a charge controller in between. Unregulated panel voltage and variable sunlight will overcharge or damage the battery. Tiny trickle panels under roughly 5W are the only common exception.
Key Takeaways
Solar battery charging is a staged, controller-managed process where chemistry, controller type, and system architecture together determine how fast, how fully, and how safely your battery charges.
| Point | Details |
|---|---|
| Four charging stages | Bulk, Absorption, Float, and Equalization (flooded lead-acid only) move a battery from depleted to full in sequence. |
| Charge controller is required | Controllers regulate voltage, manage charging stages, and block reverse current; skipping one risks battery damage. |
| MPPT outperforms PWM | MPPT controllers harvest roughly 15% more energy than PWM, especially with higher-voltage arrays or cold conditions. |
| Chemistry determines settings | LiFePO4 needs absorption at 14.2–14.6V, float at ~13.6V or disabled, and equalization turned off entirely. |
| Bansheebatteries LiFePO4 options | Bansheebatteries offers 12V LiFePO4 batteries with integrated BMS and a 5-year warranty for marine and off-grid use. |
Table of Contents
- How the four charging stages actually work
- What a charge controller does and how to choose between MPPT and PWM
- How charging behavior differs by battery chemistry
- DC-coupled vs. AC-coupled systems: how energy flows
- How long does it take to charge a solar battery?
- Best practices and troubleshooting for solar battery systems
- Why LiFePO4 is often the right call for small and off-grid systems
- Sources
How the four charging stages actually work
The four charging stages are not arbitrary steps a manufacturer invented. Each one reflects a real electrochemical behavior inside the battery, and understanding them lets you read your controller display intelligently instead of guessing.
Bulk stage is where most of the work happens. The controller pushes the maximum current the panels can deliver, and the battery voltage climbs steadily. For a 12V flooded lead-acid battery, voltage typically rises from around 12.0–12.2V (a depleted state) toward 14.4–14.8V. SOC moves from wherever you started up to a high state of charge. This stage is fast because the battery is hungry and accepts current readily.
Absorption stage kicks in once the battery hits the bulk setpoint voltage. The controller holds that voltage constant while the battery’s internal resistance rises and current naturally tapers off. Think of it like filling a water balloon near capacity: you keep the pressure steady and let the flow slow on its own. SOC climbs close to full charge during this phase. Duration varies by battery size and temperature, but 1–3 hours is typical for lead-acid.
Float stage drops the voltage to a lower maintenance level, typically 13.2–13.8V for lead-acid chemistries. The battery is essentially full, and float just compensates for self-discharge. A battery can sit on float indefinitely without damage, which is why solar systems with consistent sun exposure can leave the controller connected without worry.
Equalization is a different animal entirely. It applies a controlled overcharge voltage (usually 15.0–15.5V for 12V flooded lead-acid) for a set period to break up lead sulfate crystals that accumulate on the plates over time. It also balances the charge across individual cells. Equalization is only appropriate for flooded lead-acid batteries. Running it on sealed AGM, GEL, or any lithium chemistry will damage or destroy the battery.
Pro Tip: Never run equalization on a sealed battery. If your controller has an equalization setting and you’re using AGM, GEL, or LiFePO4, disable it in the controller menu before the first charge.
Typical voltage setpoints and SOC ranges for 12V systems
| Chemistry | Bulk / Absorption Voltage | Float Voltage | Equalization Voltage | SOC at End of Bulk |
|---|---|---|---|---|
| Flooded lead-acid | 14.4–14.8V | 13.2–13.8V | 15.0–15.5V | ~80–90% |
| AGM / GEL | 14.4–14.8V | 13.6–13.8V | Disabled | ~80–90% |
| LiFePO4 | 14.2–14.6V | 13.6V or disabled | Disabled | ~90% |
These are representative ranges. Always verify the exact setpoints in your battery manufacturer’s documentation, since values vary by brand and cell configuration.
What a charge controller does and how to choose between MPPT and PWM
A charge controller does more than just limit voltage. Its core functions include:
- Regulating the voltage and current flowing from the panels to the battery
- Executing the multi-stage charging profile automatically
- Blocking reverse current at night so the battery doesn’t discharge back through the panels
- Protecting against overcurrent, short circuits, and overtemperature conditions
- Providing a monitoring interface showing SOC, voltage, and charging state
Without a controller, panels would push whatever voltage they generate directly into the battery. On a cold, clear morning, an unloaded panel can produce well above its rated voltage, which is enough to damage or destroy a battery in a short time.
MPPT vs. PWM: which one do you actually need?
PWM (Pulse Width Modulation) controllers work by rapidly switching the panel connection on and off to regulate current. They’re simple, inexpensive, and reliable, but they require the panel’s nominal voltage to closely match the battery voltage. A 12V panel array works fine with a PWM controller on a 12V battery. Mismatch the voltages and you waste the difference as heat.
MPPT (Maximum Power Point Tracking) controllers use a DC-to-DC converter to continuously find the panel’s optimal operating point and step the voltage down to what the battery needs, capturing energy that PWM would waste. MPPT controllers can improve energy harvest by a significant margin compared with PWM under common conditions, particularly with higher-voltage panel arrays, cold weather, or partial shading. That gap widens when you wire panels in series to raise array voltage, which is the standard approach for longer cable runs.
| Feature | MPPT | PWM |
|---|---|---|
| Efficiency advantage | 15–30% more harvest in most conditions | Baseline |
| Best use case | Higher-voltage arrays, cold climates, larger systems | Small 12V systems with matched panel voltage |
| Panel voltage flexibility | High — handles wide voltage range | Low — panel Voc must be close to battery voltage |
| Cost | Higher upfront | Lower upfront |
| Charge profile support | Full multi-stage, lithium profiles | Full multi-stage on quality units |
For larger systems or systems using LiFePO4 batteries, MPPT controllers are usually the better choice due to efficiency gains.
If your panels produce 20A Isc combined, use a 25A controller minimum. Undersizing a controller is one of the most common DIY mistakes, and it can cause the controller to run hot and fail early.*
LiFePO4 batteries require a controller that supports a dedicated lithium charge profile. A controller running a lead-acid profile on a LiFePO4 battery will either undercharge it (if float voltage is too low) or risk overcharging it (if absorption voltage is set too high). Check that your controller has a named lithium or LiFePO4 setting before you buy.
Understanding how you wire panels together also affects controller selection. Whether you run panels in series or parallel changes the array voltage and current, which directly determines whether MPPT or PWM is the right fit.
How charging behavior differs by battery chemistry
The three chemistries you’ll encounter in home and small systems each charge differently, and mixing up their settings is one of the fastest ways to shorten battery life.
Flooded lead-acid
Flooded lead-acid batteries are the oldest and most forgiving chemistry in terms of controller compatibility, but they demand the most hands-on maintenance. They accept equalization, tolerate slight overcharging better than sealed types, and need periodic water top-ups because charging produces hydrogen and oxygen gas that escapes through the vents.
AGM and GEL
AGM (Absorbent Glass Mat) and GEL batteries are sealed, so they cannot vent gas safely. That means equalization is off the table. They’re more sensitive to overcharging than flooded cells, so absorption voltage should stay at the lower end of the lead-acid range. AGM batteries handle moderate discharge depths well and require almost no maintenance beyond keeping connections clean. For a deeper look at AGM-specific upkeep, the AGM battery maintenance guide from Bansheebatteries covers the key practices.
LiFePO4
LiFePO4 is where the charging profile diverges most sharply from lead-acid. Recommended absorption voltage sits at 14.2–14.6V, float at approximately 13.6V or disabled entirely, and equalization must be turned off. LiFePO4 cells accept high charge currents throughout most of the cycle and reach full charge faster than lead-acid. They also have a built-in Battery Management System (BMS) that monitors cell voltage, temperature, and current, cutting off charge or discharge if any parameter goes out of range.
One critical limitation: LiFePO4 batteries should not be charged below 32°F (0°C). Most BMS units will block charging automatically at low temperatures, but if yours doesn’t, the controller must be set to pause charging in freezing conditions to avoid lithium plating inside the cells.
Temperature compensation is worth enabling for lead-acid batteries. It adjusts the absorption voltage slightly based on ambient temperature, which matters in a garage or outdoor enclosure that swings between seasons. LiFePO4 batteries generally do not benefit from temperature compensation and some manufacturers advise against it.
DC-coupled vs. AC-coupled systems: how energy flows
The architecture of your solar storage system determines how many times energy gets converted before it reaches the battery, and every conversion costs efficiency.
DC-coupled systems follow a direct path: panels produce DC, the charge controller regulates it, and DC flows straight into the battery. When you need AC power, the inverter draws from the battery and converts DC to AC once. This is the standard layout for off-grid cabins, RVs, boats, and most DIY home backup systems. DC-coupled systems are typically more efficient for battery charging because they avoid the extra DC-to-AC-to-DC conversion that AC-coupled systems require.
The flow looks like this:
Solar panels → Charge controller → Battery bank → Inverter → AC loads
AC-coupled systems use a grid-tie inverter to convert panel DC to AC first, then feed that AC into a battery inverter/charger that converts it back to DC for storage. This adds a conversion step, but it has real advantages in specific situations: retrofitting solar storage onto an existing grid-tie system, prioritizing grid export, or running a hybrid system where the battery also charges from the grid during off-peak hours.
For most small and off-grid systems, DC coupling is simpler, cheaper, and more efficient. AC coupling makes more sense when you’re adding battery backup to an existing grid-tie installation without rewiring the panel array. If you’re comparing charging strategies for an RV or boat, the RV battery charging options guide from Bansheebatteries walks through the hybrid approach in practical terms.
Practical installation notes for small systems:
- Keep battery-to-controller cable runs as short as possible to minimize resistive losses
- Use appropriately rated wire and fusing between the battery and controller
- Mount the controller where it has airflow; heat reduces efficiency and lifespan
- Place the battery in a ventilated space (especially flooded lead-acid) away from ignition sources
For readers sourcing components and off-grid hardware, Western Harmonics’ off-grid systems catalog covers a range of components worth reviewing alongside your controller and battery selection.
How long does it take to charge a solar battery?
The honest answer is: it depends on four variables. Here’s a formula that handles all of them:
Charge time (hours) = Usable Wh needed ÷ (Panel average watts × System efficiency)
Where:
- Usable Wh needed = Battery Ah × Voltage × Depth of discharge (DoD) you’re recovering
- Panel average watts = Panel rated watts × Peak sun hours per day (gives daily Wh, then divide by hours for average)
- System efficiency = roughly 0.85–0.95 for MPPT DC-coupled; 0.80–0.90 for PWM; lower for AC-coupled
-
Usable Wh = 100Ah × 12V × 0.80 DoD = 960Wh
-
Panel: 200W rated, 5 peak sun hours → 1,000Wh/day available
-
System efficiency: 0.90 (MPPT, DC-coupled)
-
Effective daily harvest: 1,000 × 0.90 = 900Wh
-
Charge time: 960 ÷ 900 = approximately 1.1 days of full sun, or roughly 5.5 hours of peak sun
-
Usable Wh = 50Ah × 12V × 0.50 DoD = 300Wh
-
Panel: 100W rated, 4.5 peak sun hours → 450Wh/day available
-
System efficiency: 0.80 (PWM)
-
Effective daily harvest: 450 × 0.80 = 360Wh
-
Charge time: 300 ÷ 360 = under one day of full sun, roughly 3.3 hours of peak sun
These examples assume clear skies, no shading, and panels oriented optimally. Real-world conditions reduce output.
Pro Tip: Look up your location’s average peak sun hours on the NREL PVWatts tool before sizing a system. A cabin in Arizona gets roughly 6–7 peak sun hours daily; one in the Pacific Northwest might average 3–4. That difference alone can double your required panel wattage for the same charging goal.
Best practices and troubleshooting for solar battery systems
Can you leave a solar charge controller connected indefinitely? Yes. That’s exactly what float stage is designed for. A properly configured controller will hold the battery at float voltage without overcharging it, so there’s no need to disconnect the system when the battery is full.
What should you watch on the controller display?
- Battery voltage and SOC percentage
- Charging stage (bulk/absorption/float)
- Daily and cumulative energy harvested
- Any fault or alarm codes
Maintenance checklist:
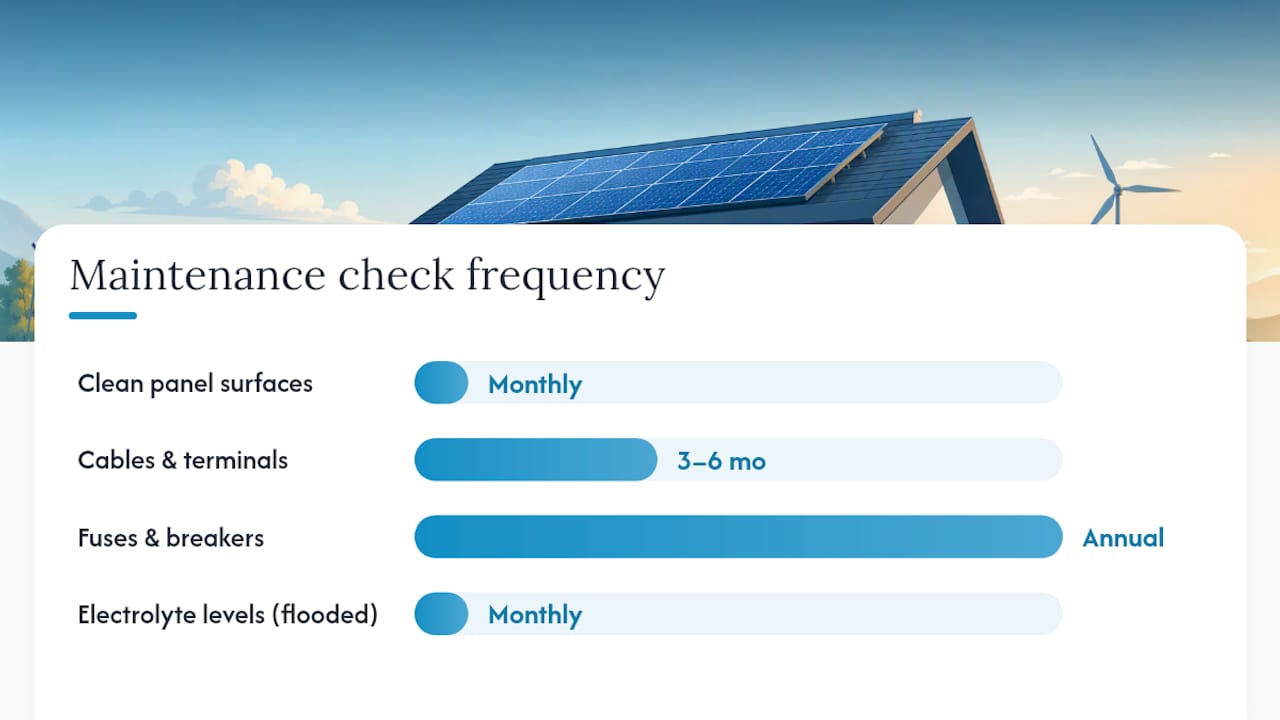
- Clean panel surfaces monthly or after dust storms; a layer of grime can cut output noticeably
- Check all cable connections and terminals for corrosion every 3–6 months
- Inspect fuses and breakers annually
- For flooded lead-acid: check electrolyte levels monthly and top up with distilled water only
- Verify controller charge profile settings haven’t reset after a firmware update or power interruption
- Monitor SOC trends over weeks; a battery that no longer reaches 100% or drops faster than usual is showing early signs of degradation
Common issues and quick troubleshooting:
Low charging current despite good sun: Check for shading on even one panel (it affects the whole series string), inspect connections for corrosion or loose terminals, and verify the controller isn’t in a fault state.
Battery not accepting charge / BMS tripping: For LiFePO4, a BMS trip usually means a cell voltage or temperature limit was hit. Check ambient temperature first. For lead-acid, chronic undercharging causes sulfation, which reduces plate area and capacity. A desulfation cycle on a compatible charger may help, but severe sulfation is permanent.
Reverse current drain at night: A properly functioning controller blocks this automatically. If your battery is discharging overnight with no loads connected, suspect a controller fault or a failed blocking diode. Replace the controller.
For safe wiring order: always connect the battery to the charge controller first, then connect the solar panels. This lets the controller detect battery voltage before panels are live. Reversing the order is a common DIY mistake that can damage the controller.
Temperature and ventilation: Flooded lead-acid batteries produce hydrogen gas during charging, especially during equalization. Install them in a ventilated enclosure and keep ignition sources away. LiFePO4 batteries are far safer in this regard but still benefit from reasonable airflow to manage heat during high-current charging.
Pro Tip: Install a dedicated solar battery monitor on the battery’s negative terminal. Controller displays show what the controller sees, not necessarily what the battery is doing. A shunt-based monitor gives you accurate SOC, current in/out, and cumulative amp-hours, which is the only reliable way to know your actual battery state.
Why LiFePO4 is often the right call for small and off-grid systems
For most home backup, RV, marine, and off-grid cabin applications, LiFePO4 is the chemistry that makes the most practical sense. Here’s why:
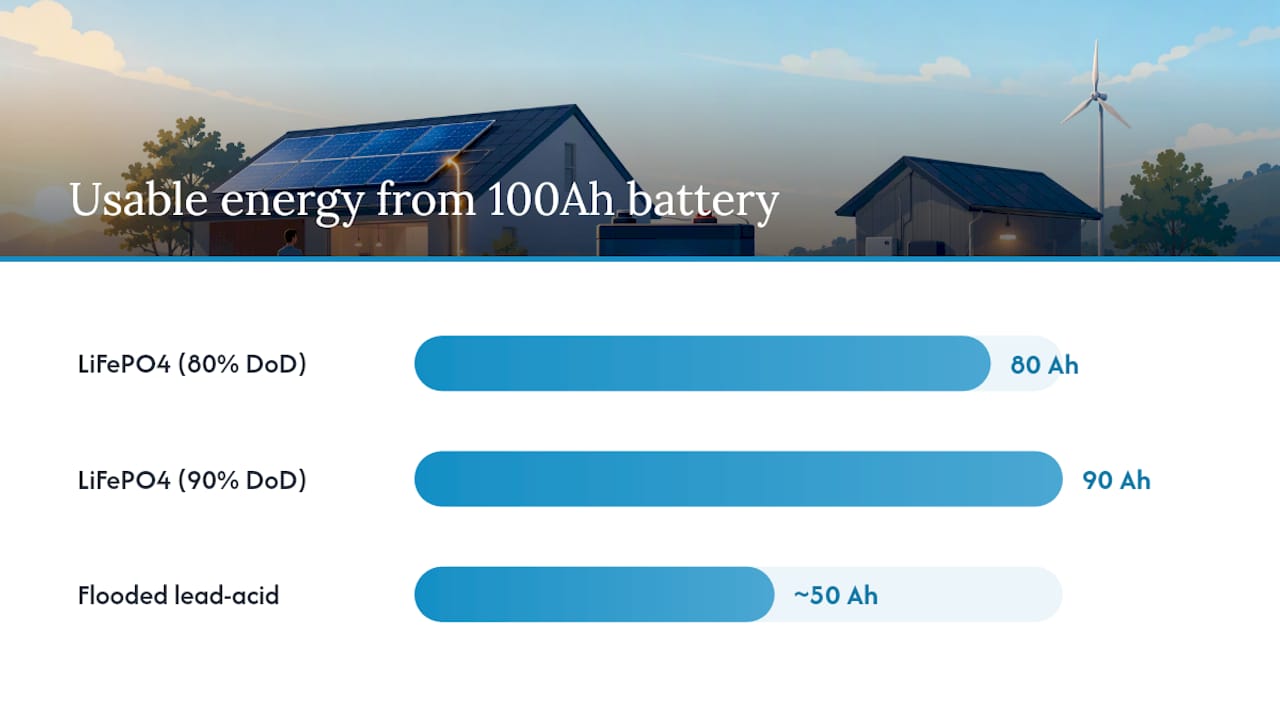
- Higher usable capacity: LiFePO4 can be discharged to 80–90% DoD routinely without damage. Flooded lead-acid should stay above 50% DoD to avoid accelerating sulfation, which means a 100Ah lead-acid battery delivers roughly half the usable energy of a 100Ah LiFePO4.
- Longer cycle life: LiFePO4 cells typically handle thousands of charge cycles at 80% DoD. Lead-acid batteries at the same depth often last a few hundred cycles.
- Faster charging: LiFePO4 accepts high charge currents throughout most of the cycle, so a well-sized MPPT controller can fill the battery in a fraction of the time a lead-acid of the same capacity would need.
- Low maintenance: No water top-ups, no equalization, no acid spills.
- Built-in BMS protection: The BMS handles cell balancing, overcharge, over-discharge, and temperature cutoff automatically.
The tradeoff is cost per Ah upfront and the requirement for a controller with a proper lithium charge profile. Running a lead-acid profile on LiFePO4 is the most common mistake in DIY solar builds, and it either leaves the battery chronically undercharged or causes repeated BMS trips.
For anyone building a solar setup around a powersports or marine application, the LiFePO4 powersports conversion guide from Bansheebatteries covers the chemistry-specific considerations in detail. And if you’re setting up a solar camp or off-grid system, understanding how the battery fits into the overall setup is worth reading before you size anything.
One recommendation worth making clearly
Set your charge controller to the lithium profile before you connect a LiFePO4 battery. Not after. Not “I’ll get to it.” Before. Then install a battery monitor on the negative terminal so you have real SOC data, not just the controller’s estimate. Those two steps, done right at the start, prevent the majority of problems that show up six months later when a battery isn’t performing the way it should. If you’re unsure which controller settings match your specific battery, contact the battery manufacturer directly. Bansheebatteries offers expert support for exactly these questions.
Power your system with the right battery from the start
Bansheebatteries builds AGM and LiFePO4 batteries specifically for powersports, marine, and off-grid applications, with over 20 years of engineering behind each one. The 12V 100Ah LiFePO4 deep cycle battery is a direct fit for the charging scenarios covered in this guide: RV house banks, marine auxiliary systems, and off-grid cabin setups. It ships with a BMS already integrated and is designed to work with MPPT controllers running a lithium profile.
For marine applications, the LiFePO4 marine battery collection covers a range of capacities with a 5-year warranty. Not sure which battery fits your system? Use the battery finder on the Bansheebatteries site or reach out to the support team for a recommendation based on your panel wattage, daily load, and controller specs.
Sources
- Solar Charge Controller Explained: Simple Guide for Homeowners
- The 4 Solar Controller Battery Charging Stages Explained
- How to Charge LiFePO4 Batteries with Solar Panels (Complete Guide) - WalkingSolar
- Can Solar Panels Charge Batteries Directly? - BatteryChat