


Two Day Camp Power for Overlanders: 100Ah Truck Dual Battery Setup
If you run a fridge, rooftop lights, a winch, or an inverter for jobsite tools, add a dedicated house battery and charge it with a DC‑DC charger on any truck with a smart alternator. AGM works fine on a tight budget or an older, simple charging system. LiFePO4 is the better call for daily overland use because it packs more usable capacity into less weight.
TL;DR:
- Choosing LiFePO4 for a 100Ah capacity ensures longer lifespan, higher usable capacity, and lighter weight compared to AGM batteries.
- Using a DC‑DC charger is essential for smart alternators or lithium batteries to avoid undercharging and ensure proper multi-stage charging.
- Proper wiring, fuse placement within six inches of each battery, and secure mounting are critical to prevent voltage drops and ensure safety.
- Always size the battery bank based on estimated daily use and consider doubling capacity for two-day autonomy, especially when running multiple accessories.
- Regular system maintenance includes checking terminal cleanliness, verifying charging voltage, and replacing swollen or aged batteries immediately.
Table of Contents
- What Is a Truck Dual Battery Setup?
- AGM or LiFePO4: How Do You Size the Auxiliary Battery?
- VSR or DC‑DC Charger: Which One Do You Need?
- How Do You Wire and Install a Dual Battery System?
- How Do You Maintain and Monitor a Dual Battery System?
- Why Trust This Guide on Dual Battery Wiring?
- What Do Most DIY Installers Get Wrong?
- Which Bansheebatteries Battery Fits Your Build?
- Sources
What Is a Truck Dual Battery Setup?
A dual battery system separates starter and accessory loads so your fridge, lights, and radio never touch the battery your engine depends on to start. The starter battery stays reserved for cranking. The auxiliary, or “house,” battery handles everything else, and it can drop low overnight without leaving you stranded at camp.
Before you buy anything, know what you’re actually shopping for. A complete build needs:
- Auxiliary battery sized for your accessory load (AGM or LiFePO4)
- Charge manager — a VSR/ACR relay or a DC‑DC charger, depending on your alternator and battery chemistry
- Fused distribution block to split power to multiple accessories safely
- Battery monitor or shunt to track real state of charge, not just voltage
- Marine-grade cable, lugs, and a battery tray or box rated for vibration and heat
Grab a multimeter, a crimping tool, heat shrink, and the correct fuse ratings before you start. Missing one part mid-install is the most common reason DIY jobs stall out halfway through a weekend.
AGM or LiFePO4: How Do You Size the Auxiliary Battery?
The chemistry decision drives everything else in the build. LiFePO4 costs more per battery but gives you close to full usable capacity, weighs roughly half as much for the same output, and lasts for far more charge cycles than AGM under regular deep-cycling.
Sizing the bank comes down to simple math:
- Add up amp draw for every accessory you’ll run off the house battery.
- Multiply amps by hours of daily use to get amp-hours (Ah) needed per day.
- Double that number for two-day autonomy, so a bad weather day or a late arrival at camp doesn’t leave you without power.
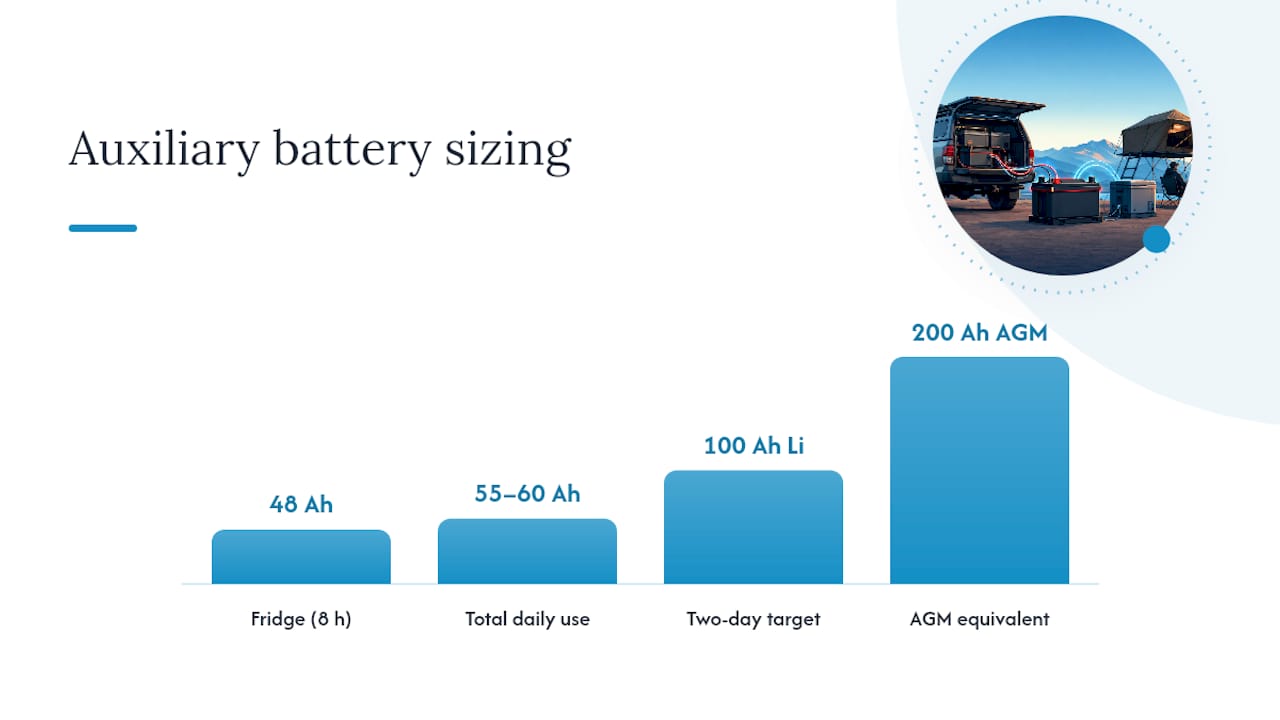
Statistic Callout: A 12V fridge pulling 6A for 8 hours a day uses about 48Ah daily. Add a light bar and phone charging and you’re closer to 55 to 60Ah. Planning for two days of autonomy points you toward roughly a 100Ah LiFePO4 battery or a 200Ah AGM equivalent, since AGM’s usable capacity is roughly half its rated total.
If you’re running LiFePO4, confirm your alternator and charger can deliver the multi-stage profile lithium cells need. A basic isolator relay without proper regulation can undercharge a lithium bank for years without you noticing. For a deeper walkthrough on matching capacity to trip length, Bansheebatteries’ guide on battery capacity planning for off-grid trips breaks down longer expedition scenarios.
VSR or DC‑DC Charger: Which One Do You Need?
Voltage-sensing relays are the simpler, older solution. They connect the two batteries when they detect charging voltage from the alternator and isolate them once voltage drops, which is fine for a basic lead-acid setup on an older truck with a conventional alternator.
The problem shows up on newer trucks. VSRs and smart relays can behave unpredictably on vehicles with PCM-controlled smart alternators, because those alternators vary voltage to save fuel and reduce load, and a VSR reading that fluctuating signal may open and close at the wrong times.
A DC‑DC charger solves that by ignoring the erratic alternator output and generating its own regulated, multi-stage charge profile. DC‑DC chargers are the recommended choice for:
- Any truck built in the last decade or so with a smart or variable-voltage alternator
- Any LiFePO4 auxiliary battery, regardless of vehicle age
- Setups that also charge from solar, since many DC‑DC units accept a solar input
Sizing the charger matters as much as sizing the battery. A 20A charger replenishes roughly 20Ah per hour of driving, while a 40A unit roughly doubles that. If your daily drives are short, a 40A charger gets your battery back to full before you park for the night; a 20A unit might leave you short after a 45-minute commute.
Pro Tip: Check your truck’s alternator spec sheet before buying a charger. “Smart alternator” language in the owner’s manual is your cue to skip the VSR entirely and go straight to DC‑DC, even if the upfront cost is higher.
How Do You Wire and Install a Dual Battery System?
Mounting location comes first. AGM batteries can go inside a sealed box under the hood, in a bed-mounted tray, or behind the seat in most trucks since they’re spill-proof. LiFePO4 batteries are also safe in enclosed spaces, but check the manufacturer’s venting notes since some builds still recommend basic airflow around the case.
Follow this sequence for a clean install:
- Disconnect the starter battery’s negative terminal before touching any wiring.
- Mount the auxiliary battery and secure it against vibration with a proper tray, not bungee cords.
- Run the main positive cable from the starter battery to your charge manager, sizing the gauge for the full run length. Longer runs need thicker cable to avoid voltage drop, and many builders add a Big 3 upgrade (upgraded alternator, ground, and battery cables) when adding significant new load.
- Install a fuse on every positive run within about six inches of the battery terminal, not further down the line.
- Wire the charge manager output to the auxiliary battery, then run power from the auxiliary battery to a fused distribution block.
- Wire accessories off the distribution block, using Anderson plugs for anything you might unplug and remove, like a portable fridge or a slide-out drawer system.
- Reconnect the starter battery and test.
Before calling it done, run through this safety pass:
- Check resting voltage on both batteries with a multimeter
- Confirm charging voltage rises at the auxiliary battery once the engine starts
- Verify every ground connection is clean, tight, and rust-free
- Torque terminals to spec, and never pair a brand-new battery with a worn-out one in the same bank
How Do You Maintain and Monitor a Dual Battery System?
Shunt-based monitors report actual amp-hours used and remaining, which beats a voltage-only gauge that can mislead you, especially with LiFePO4, where voltage stays flat across most of the discharge curve.
Build a short routine into every trip prep:
- Inspect terminals for corrosion and cable insulation for chafe points
- Check the fuse and its mount for looseness
- Never charge LiFePO4 below freezing without a built-in low-temp cutoff in the battery management system
- Store AGM batteries fully charged over winter to avoid sulfation
A battery that won’t hold a charge overnight, or one that shows swelling or a warm case at rest, needs replacing. Some jurisdictions require specific chemical warnings on battery products, so check labeling if you’re buying used or unbranded cells.
Why Trust This Guide on Dual Battery Wiring?
This guide is informed by expertise in designing AGM and LiFePO4 batteries for powersports and marine use, environments that punish poor wiring and weak cells faster than daily driving does. The wiring guidance here is supported by industry-leading warranties on AGM and lithium marine batteries.
For vehicle-specific wiring diagrams, the overland dual battery wiring guide and the boat dual battery system guide both walk through real installs with the same core wiring logic used in truck builds. Readers running a winch alongside their auxiliary battery should also check the winch battery guide for reserve capacity notes.
What Do Most DIY Installers Get Wrong?
Undersized cable on a long run is the mistake that shows up months later as voltage drop and a battery that never quite tops off. Fuse placement is the second one. A fuse mounted three feet down the line protects nothing on the unfused section before it.
Route new wiring along OEM harnesses, use Anderson connectors on removable loads, and test the full charge cycle before you button up the install. Three rules keep you from a no-start: fuse at the source, match your charger to your chemistry, and never trust a connection you haven’t tested with a meter.
— Donald
Which Bansheebatteries Battery Fits Your Build?
Once you know your numbers, matching hardware gets simple. For LiFePO4 builds sized around that 100Ah target from the sizing example above, the 12V 100Ah LiFePO4 deep cycle battery covers fridge, lighting, and phone charging loads with room to spare, and the full lithium marine battery collection covers larger banks for winch-heavy or inverter-heavy builds.
Whatever chemistry you land on, match your charger to the battery before you order either one. A DC‑DC charger built for lead-acid won’t deliver the multi-stage profile a lithium bank needs, and running the wrong combination quietly shortens battery life without ever throwing an obvious warning. If you’re still narrowing down capacity or chemistry, Bansheebatteries’ team can walk through your load list and point you to the right pairing. Browse the Bansheebatteries product lineup and check your battery against your accessory list before you commit to a cart.
Sources
The technical claims in this guide draw on a handful of solid references worth bookmarking. TruckCustom’s dual battery system guide covers the starter/house separation concept in more depth. JS Alternators’ wiring guide is the best resource on DC‑DC sizing and smart alternator compatibility. OutdoorX4’s explainer covers battery matching and fuse placement in detail, and TuffStuffOverland’s step-by-step guide walks through the sizing math used above. For charger maintenance basics beyond the truck itself, this battery charger and maintainer guide is a useful companion reference.
- Dual Battery System Guide: How to Wire, Size, and Pair with a High Output Alternator - JS Alternators
- Dual battery systems, explained - OutdoorX4
- How to set up a dual battery system step by step - TuffStuffOverland