


Marine Battery Bank Setup: Your 2026 Boat Guide
A marine battery bank is defined as a system of two or more batteries wired together to store and deliver the electrical power your vessel needs to run safely and reliably. Getting your marine battery bank setup right means calculating your load accurately, choosing the correct battery chemistry, wiring everything to ABYC standards, and matching your charging sources to your batteries. Boat owners who skip any one of these steps end up with dead banks, failed starts, or fire hazards. This guide covers every critical decision, from sizing to installation, so your system performs from the first trip to the last.
How to size your marine battery bank
Sizing a battery bank for boats starts with your daily amp-hour (Ah) load. Add up every electrical device on your vessel, multiply its current draw in amps by the hours you run it each day, and you get your daily Ah requirement. A VHF radio drawing 6 amps for 2 hours, a bilge pump averaging 3 amps for 1 hour, and LED lighting at 4 amps for 5 hours totals 35 Ah per day. Add a refrigerator at 5 amps for 8 hours and you are at 75 Ah daily.
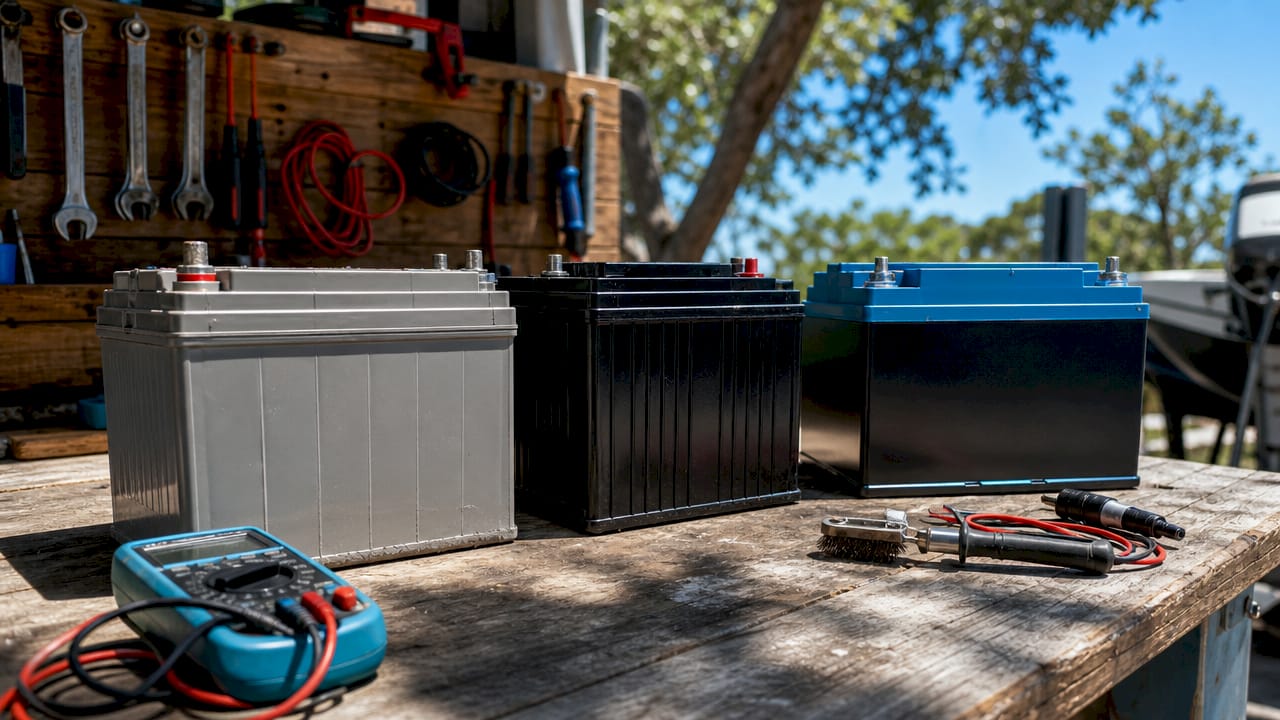
Battery chemistry determines how much of that rated capacity you can actually use. Lead-acid and AGM batteries deliver about 50% usable capacity before damage occurs, while LiFePO4 batteries allow 80–90% depth of discharge. That difference changes your bank size dramatically. A 100 Ah per day load with two days of reserve requires 400 Ah of AGM capacity but only 250 Ah of LiFePO4.
Pro Tip: Always build in at least one day of reserve capacity beyond your calculated daily load. Cloudy days cut solar input, and unexpected overnight anchoring drains more than planned.
| Device | Draw (amps) | Hours/day | Daily Ah |
|---|---|---|---|
| VHF radio | 6 | 2 | 12 |
| LED lighting | 4 | 5 | 20 |
| Bilge pump | 3 | 1 | 3 |
| Refrigerator | 5 | 8 | 40 |
| Total | 75 Ah |
Use this formula: Bank size (Ah) = (Daily load × Reserve days) ÷ Usable depth of discharge. For choosing the right battery size, run this calculation before you buy anything.
Which battery chemistry works best for marine banks?
The three chemistries used in marine applications are flooded lead-acid, AGM, and LiFePO4. Each has a distinct profile, and picking the wrong one for your usage pattern costs you money and reliability.
Flooded lead-acid batteries are the lowest upfront cost option. They require regular water topping, produce hydrogen gas during charging, and need ventilated compartments. Cycle life is the shortest of the three, typically 200–400 cycles to 50% depth of discharge.
AGM (Absorbent Glass Mat) batteries are sealed, spill-proof, and maintenance-free. They handle vibration well, making them a strong fit for powerboats. Bansheebatteries backs its AGM marine batteries with a 4-year warranty, which reflects their durability in demanding conditions. AGM charges faster than flooded lead-acid but still tops out at 50% usable capacity.
LiFePO4 batteries deliver the best cycle life, the lightest weight, and the fastest charge acceptance. LiFePO4 marine batteries are compelling for boaters who cycle their banks daily, despite the higher upfront cost. Bansheebatteries offers a 5-year warranty on its lithium marine batteries, the longest in its lineup.
Key considerations by chemistry:
- Flooded lead-acid: Low cost, high maintenance, requires venting, shortest cycle life
- AGM: Sealed, vibration resistant, no maintenance, 50% usable capacity, mid-range cost
- LiFePO4: 80–90% usable capacity, longest cycle life, lightest weight, requires BMS, highest upfront cost
Separating your engine starting battery from your house bank is non-negotiable. Starting batteries deliver short, high-current bursts. House banks support sustained loads and must be deep cycle. Running both functions from one battery is the fastest path to a dead engine at the worst moment.
How should you wire a marine battery bank?
Wiring configuration determines whether your bank delivers the right voltage, the right capacity, or both. Three configurations cover every marine application.
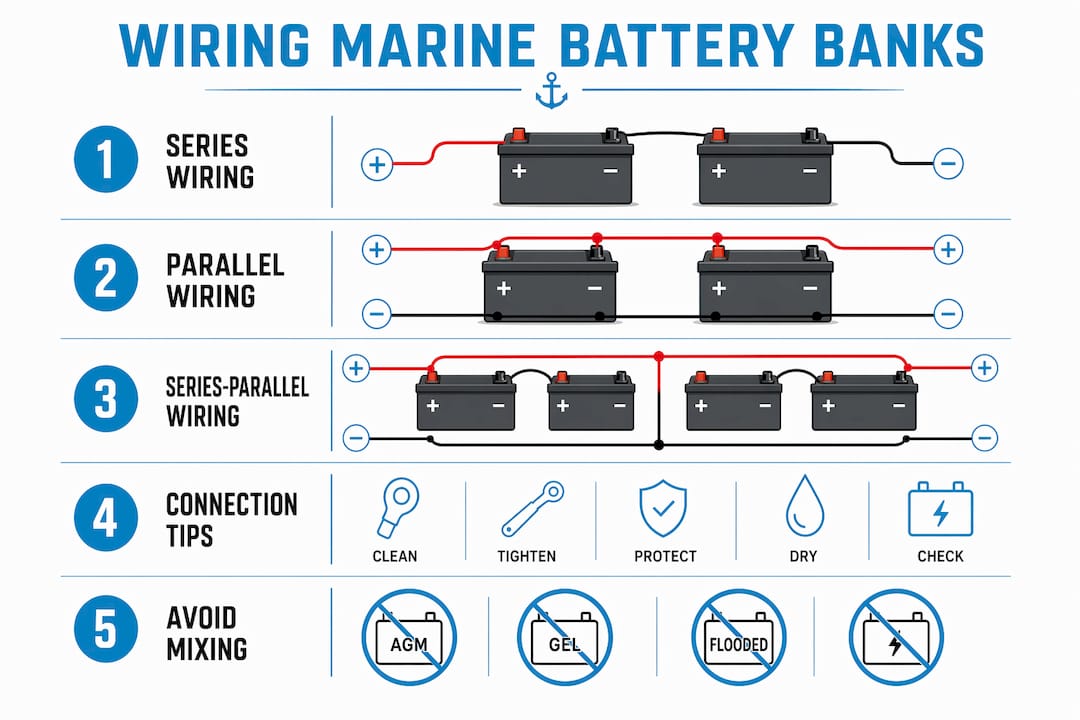
Series wiring connects the positive terminal of one battery to the negative terminal of the next. This doubles voltage while keeping capacity the same. Two 12V, 100 Ah batteries in series produce 24V at 100 Ah. Use this for trolling motors or bow thrusters that run on 24V or 36V systems.
Parallel wiring connects all positive terminals together and all negative terminals together. Voltage stays the same, and capacity adds up. Two 12V, 100 Ah batteries in parallel give you 12V at 200 Ah. This is the standard configuration for 12V house banks that need more runtime.
Series-parallel wiring combines both methods. Four 12V, 100 Ah batteries wired as two series pairs connected in parallel produces 24V at 200 Ah. This suits larger vessels with high-voltage, high-capacity demands.
| Wiring type | Voltage result | Capacity result | Best use case |
|---|---|---|---|
| Series | Increases | Stays the same | 24V or 36V motor systems |
| Parallel | Stays the same | Increases | 12V house banks needing more Ah |
| Series-parallel | Increases | Increases | Large vessels, high-demand systems |
Pro Tip: In a parallel bank, connect your positive load cable to the positive terminal of the first battery and your negative load cable to the negative terminal of the last battery. This diagonal connection method forces balanced current flow across every battery in the bank.
Mixing battery chemistries, capacities, or ages in any wiring configuration causes circulating currents, heat buildup, and accelerated failure. Always use matched batteries with the same brand, model, and age. This is not a suggestion. It is the single most common cause of premature bank failure.
What do ABYC standards require for marine charging systems?
Marine battery charging is governed by ABYC standards E-10, E-11, and E-13, which cover conductor sizing, overcurrent protection, fuse placement, and lithium-specific safety requirements. These standards apply to all new installations and major upgrades in 2026.
Charger sizing follows a clear rule: size your charger at 10–20% of your total bank capacity in amp-hours. A 200 Ah bank pairs with a 20–40 amp charger. An undersized charger never completes the absorption stage, which leaves batteries partially charged and shortens their life.
ABYC E-10 requires fuses within 7 inches of every battery terminal. E-11 governs conductor sizing based on current load and wire run length. E-13 specifically addresses lithium battery banks, requiring an integrated Battery Management System (BMS) with disconnect authority and thermal runaway response measures. Standard ANL fuses do not meet the interrupting capacity required for LiFePO4 banks. ABYC recommends Class T or Class NH fuses with very high ampere interrupting capacity (AIC) ratings for lithium installations.
Multiple charging sources strengthen a marine power system. Alternators charge the bank while the engine runs. Shore power chargers maintain batteries at the dock. Solar panels extend range on anchor. Each source must use a charger profile matched to your battery chemistry. Incorrect charge profiles cause sulfation in lead-acid batteries and capacity loss in lithium cells, cutting lifespan significantly.
Key charging system requirements:
- Charger output: 10–20% of bank Ah capacity
- Fuse placement: within 7 inches of battery terminals per ABYC E-10
- LiFePO4 banks: require BMS with disconnect authority per ABYC E-13
- Fuse type for lithium: Class T or Class NH, not standard ANL
- Charger profile: must match battery chemistry exactly
Step-by-step guide to installing your marine battery bank
A proper marine battery installation follows a specific sequence. Skipping steps creates safety hazards and voids warranties.
- Gather tools and materials. You need marine-grade cables, ring terminals, a torque wrench, a cable cutter and crimper, heat-shrink tubing, battery boxes or trays, fuses, and corrosion inhibitor spray.
- Disconnect all power sources. Turn off the main battery switch, disconnect shore power, and isolate any solar input before touching any terminal.
- Mount batteries securely. Use battery boxes or hold-down straps rated for marine use. Batteries must not shift in rough water. Compartments for flooded lead-acid batteries require ventilation to exhaust hydrogen gas.
- Route cables correctly. Keep cable runs as short as practical. Route cables away from heat sources, sharp edges, and moving parts. Use cable clamps every 18 inches.
- Install fuses first. Place the correct fuse within 7 inches of each battery positive terminal before connecting any load. Loose terminals and absent fuses generate heat and risk cable fires in a short circuit.
- Crimp and torque terminals. Use a quality marine crimper. Torque terminal bolts to the manufacturer’s specification. Loose connections cause resistance, heat, and voltage drop.
- Apply corrosion inhibitor. Spray all terminals with a marine-grade corrosion inhibitor after final connection. Reapply every season.
Pro Tip: Label every cable at both ends with its circuit name and amperage. Marine surveyors check this, and it saves hours of troubleshooting when something goes wrong at 2:00 AM offshore.
Routine maintenance keeps the bank healthy:
- Check state of charge monthly with a quality battery monitor or voltmeter
- Inspect terminals for corrosion and clean with a baking soda solution if needed
- Verify hold-down hardware is tight before every season
- Troubleshoot voltage drop by measuring voltage at the battery and at the load. A difference greater than 0.5V points to a wiring or connection problem.
Key Takeaways
A correct marine battery bank setup requires accurate load sizing, matched battery chemistry, proper wiring configuration, and full compliance with ABYC E-10, E-11, and E-13 standards.
| Point | Details |
|---|---|
| Size before you buy | Calculate daily Ah load and apply depth-of-discharge factor before selecting bank capacity. |
| Match chemistry to usage | AGM suits occasional boaters; LiFePO4 pays off for daily cyclists with its 80–90% usable capacity. |
| Wire with balance in mind | Use diagonal connection in parallel banks to distribute current evenly and prevent uneven wear. |
| Follow ABYC standards | Fuses within 7 inches of terminals and BMS with disconnect authority are required, not optional. |
| Separate starting from house | Never run engine starting and house loads from the same battery bank. |
What I’ve learned after years of watching marine electrical systems fail
The most expensive mistake I see boat owners make is treating the battery bank as an afterthought. They spend months choosing the right hull, the right engine, and the right electronics, then grab whatever batteries are on sale and wire them up without a plan. The result is a system that works fine at the dock and fails the moment it matters.
The second most common mistake is mixing old and new batteries in the same bank. I have seen this destroy a brand-new battery in a single season because the older cell dragged the whole bank down. Mismatched batteries in series or parallel create circulating currents that generate heat and kill efficiency. Buy matched sets, always.
Charger compatibility is where I see the most false economy. Boat owners buy a charger that “works on 12V batteries” without checking whether it supports the correct absorption voltage and charge profile for their chemistry. A charger running an AGM profile on a LiFePO4 bank will undercharge it every time. That means you never get full capacity, and the BMS eventually trips because the charge curve is wrong.
My honest recommendation for anyone who sails or cruises regularly: go lithium. The upfront cost is real, but the weight savings, the usable capacity, and the cycle life make it the better investment over a five-year horizon. Bansheebatteries’ 5-year warranty on lithium marine batteries reflects that confidence. Document your installation with photos and a wiring diagram. Marine surveyors ask for this, and it protects your insurance coverage.
— Donald
Bansheebatteries marine power solutions for your vessel
Bansheebatteries has built marine power solutions for over 20 years, and the product lineup reflects that experience directly.
The marine battery collection covers both AGM and LiFePO4 options sized for everything from small fishing boats to larger cruising vessels. The AGM line carries a 4-year warranty and handles the vibration and moisture that marine environments demand. The lithium marine batteries deliver 80–90% usable capacity with a 5-year warranty, making them the right fit for boaters who cycle their banks hard. Compatible chargers are available for both chemistries, sized to meet the 10–20% charging rule that protects battery health. If you need help matching a battery bank to your vessel’s load, the Bansheebatteries team provides expert guidance before you buy.
FAQ
What is a marine battery bank setup?
A marine battery bank setup is the process of designing, sizing, and installing a system of batteries to meet a vessel’s electrical load safely and reliably. It includes selecting battery chemistry, calculating amp-hour capacity, wiring configuration, and compliance with ABYC standards.
How do I calculate the right battery bank size?
Multiply each device’s amp draw by its daily hours of use, total all devices, then divide by your battery chemistry’s usable depth of discharge. AGM requires twice the rated capacity for the same usable energy as LiFePO4.
Can I mix AGM and lithium batteries in the same bank?
No. Mixing battery chemistries causes current imbalances, heat buildup, and accelerated failure in both batteries. Always use matched batteries with the same brand, model, and age.
What charger size do I need for my marine battery bank?
Size your charger at 10–20% of your total bank capacity in amp-hours. A 200 Ah bank needs a 20–40 amp charger. Undersized chargers fail to complete the absorption stage and shorten battery life.
Do LiFePO4 marine batteries require special fuses?
Yes. ABYC E-13 requires Class T or Class NH fuses for lithium battery banks because standard ANL fuses lack the ampere interrupting capacity needed to safely protect high-output LiFePO4 systems.