


How to Install a Dirt Bike Battery: Step-by-Step Guide
The fastest, safest way to replace a dirt bike battery: disconnect the negative (black) terminal first, lift out the old battery, drop in the new one, connect positive (red) first, then negative last, and test. That sequence prevents sparks from grounding against the frame and protects your bike’s electrical system. Every step in this dirt bike battery installation guide follows that same logic: break the circuit safely, verify before you connect, and test before you ride.
Before you touch anything, pull your factory service manual. It tells you exactly where the battery sits on your specific model, the correct torque for terminal bolts, and which fuses protect which circuits. If you need a replacement battery or a compatible charger, Bansheebatteries carries vehicle-specific AGM and LiFePO4 options with fitment guidance built in.
Key Takeaways
Disconnect the negative terminal first and reconnect it last every time: that single rule prevents the majority of sparks, shorts, and electrical damage during a dirt bike battery swap.
| Point | Details |
|---|---|
| Negative off first, positive last | Remove the negative cable before the positive; reverse the order on reinstall to prevent frame shorts. |
| Confirm fitment and chemistry | Match physical dimensions, terminal orientation, and AGM or LiFePO4 chemistry before installing. |
| Secure against vibration | Use factory hold-downs, foam shims for smaller lithium units, and check terminal tightness after the first ride. |
| Test the charging system | At ~5,000 rpm, the charging system should read 13.5–14.8V; below that range points to a stator or regulator fault. |
| Bansheebatteries for fitment | Bansheebatteries offers vehicle-specific AGM and LiFePO4 batteries with charger pairing guidance and a 4-year AGM warranty. |
Table of Contents
- What tools and parts do you need for a dirt bike battery installation?
- Critical safety warnings before you touch the battery
- Where does the battery sit on a dirt bike, and how do you reach it?
- How to disconnect and remove the old battery safely
- How do you verify the replacement battery is the right fit?
- How to install the new battery correctly
- How do you test the electrical system after installation?
- How to secure the battery against off-road vibration
- Routine maintenance, storage, and responsible disposal
- Why chemistry and warranty matter: Bansheebatteries’ product guidance
- Bansheebatteries has the right battery and charger for your bike
- Sources
What tools and parts do you need for a dirt bike battery installation?
Get everything on this list before you start. Stopping mid-job to hunt for a wrench is how small parts disappear into the subframe.
Hand tools:
- Metric socket set (8mm, 10mm most common for terminal bolts and panel screws)
- Flat-head and Phillips screwdrivers
- Needle-nose pliers
- Wire brush (for terminal corrosion)
- Torque driver or small torque wrench (optional but worth it)
Parts and consumables:
- Correct replacement battery (matched by size, terminal orientation, and chemistry)
- Spare terminal bolts or lead-nuts if the originals are corroded
- Dielectric grease (prevents future corrosion)
- Closed-cell foam shims or a battery strap (for securing the battery)
- Shop towels
PPE:
- Safety glasses
- Nitrile gloves
- Small container of baking soda mixed with water (neutralizes acid spills on contact)
A multimeter is non-negotiable for testing. A digital unit from any hardware store works fine.
Critical safety warnings before you touch the battery
Always remove the negative (ground) cable first. The negative terminal connects to the bike’s frame. If you loosen the positive terminal first and your wrench touches the frame, you complete a circuit instantly and get a spark or worse. RevZilla’s motorcycle battery guide confirms this: reversing the order raises the real risk of shorting the frame.
Three hazards to keep in mind:
Short circuits. A positive cable touching bare metal while the negative is still connected will arc, potentially melting insulation or blowing a fuse. Keep a shop towel over the positive terminal after you remove it.
Hydrogen gas. Lead-acid and AGM batteries vent small amounts of hydrogen during charging. Work in a ventilated space and keep open flames away. Lithium (LiFePO4) batteries vent far less, but the same rule applies.
Acid burns. Wet-cell batteries contain sulfuric acid. If you crack a case or spill electrolyte, flush the area with water immediately and apply baking soda solution to neutralize. Nitrile gloves and safety glasses are not optional here.
Pre-checks before you start:
- Turn the ignition off and remove the key
- Disconnect any battery charger or tender
- Identify the main fuse location (usually near the battery or under the seat)
- Confirm the bike is on a center stand or paddock stand, upright and stable
Pro Tip: If your bike has a GPS tracker or alarm wired directly to the battery, note the reset procedure before disconnecting. Some units require a code entry after power loss.
Where does the battery sit on a dirt bike, and how do you reach it?
Most dirt bike batteries live in one of three spots: under the seat, tucked beside the airbox under the subframe, or behind a side panel. The quickest way to find yours is to check the service manual, which will show the exact location and the fasteners involved. Consulting the factory manual before starting saves time and prevents broken clips.
Common access steps by location:
- Under the seat: Remove one or two seat bolts (usually 8mm or 10mm), lift the seat rearward, and the battery is visible in a tray.
- Beside the airbox: Remove the side panel (often held by push-pin rivets or a single bolt), then slide the battery out of its tray.
- Under the subframe: Some enduro and trail bikes mount the battery low and forward; you may need to remove the airbox or a bracket before the battery tray is accessible.
A few practical tips for panel removal:
- Use a plastic trim tool or a flat-head screwdriver wrapped in tape to pop rivet clips without cracking the plastic
- Drop all removed fasteners into a magnetic parts tray or a cup so nothing rolls under the bike
- Take a smartphone photo of the cable routing and any zip ties before you touch anything. Reassembly goes twice as fast when you can see exactly how the cables were routed
Fitment and mounting guidance from Dirt Bike Empire notes that compact, maintenance-free batteries are the practical choice for tight airbox-adjacent trays, and that verifying the wiring diagram before connecting is worth the extra two minutes.
How to disconnect and remove the old battery safely
Short answer: negative terminal off first, positive second, then lift the battery straight out.
- Switch off the ignition and remove the key from the bike.
- Place the bike on a center stand or paddock stand so it cannot tip.
- Access the battery compartment using the steps above.
- Locate the negative (black) terminal. Loosen the bolt with the correct metric socket and slide the cable off. Fold the cable back so it cannot contact the terminal accidentally.
- Locate the positive (red) terminal. Loosen and remove the bolt, slide the cable off, and drape a shop towel over the exposed terminal.
- Remove the hold-down strap, bracket, or bolt that secures the battery in the tray.
- Lift the battery straight up and out. Lead-acid and AGM batteries are heavier than they look; use both hands and keep the battery level to avoid spilling electrolyte.
Corrosion cleanup and cable inspection:
- Use a wire brush to scrub white or blue-green buildup off the terminal posts and cable connectors
- If corrosion has eaten into the cable lug, replace the cable before installing the new battery
- Check the main fuse and any inline fuses near the battery while you have access
Pro Tip: Save every lead-nut and small fastener in a parts tray the moment you remove them. These tiny nuts are notorious for falling into the subframe. A short piece of vinyl tubing slipped over the stud holds the nut in place while you position the battery, making reinstallation much easier. This trick comes straight from RevZilla’s installation walkthrough.
Before moving on, inspect:
- Cable insulation for cracks, melting, or chafing marks
- Terminal connectors for cracks or heavy pitting
- The battery tray for cracks or corrosion that could damage the new battery
How do you verify the replacement battery is the right fit?
Check three things before the new battery leaves the box: physical footprint, terminal orientation, and chemistry.
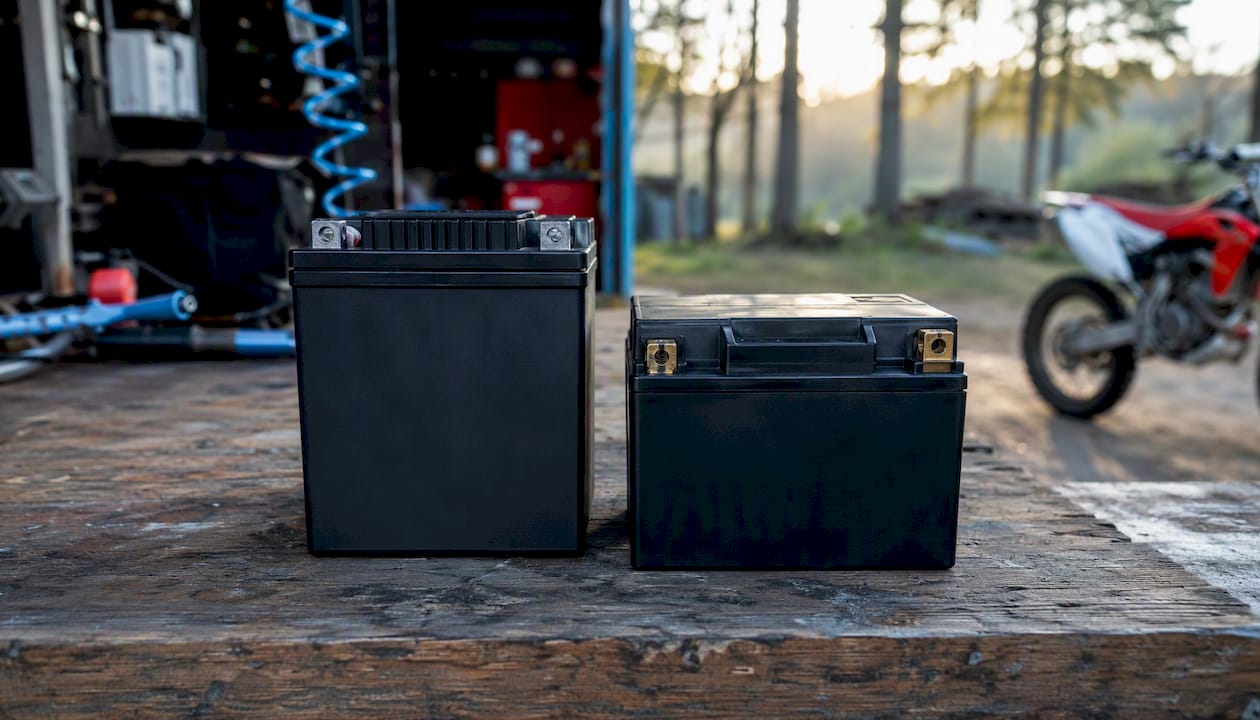
A battery that is 2mm too tall will not clear the seat or side panel. A battery with reversed terminal positions will put the positive cable on the wrong side, creating tension or a potential short. Getting these wrong means pulling the battery back out.
Fitment checklist:
- Match length, width, and height to the original (or to the spec in your service manual)
- Confirm terminal polarity: positive on the left or right matches your cable layout
- Check the hold-down method: some trays use a bottom lip, others use a top strap or bolt-down bracket
- If the new battery is smaller (common with lithium units), use closed-cell foam shims to fill the gap and prevent movement
AGM vs. LiFePO4: what actually matters for your install
AGM batteries use absorbed glass mat technology to hold electrolyte. They are heavier, more tolerant of varied charging profiles, and generally less expensive. LiFePO4 (lithium iron phosphate) batteries are significantly lighter, hold a charge longer in storage, and have a longer service life, but they require a charger or charger setting specifically designed for lithium chemistry. Using an AGM charger on a LiFePO4 battery can damage cells and void the warranty. Bansheebatteries covers this in detail in their AGM vs. LiFePO4 comparison.
| Battery type | Resting voltage | Fully charged | Weight | Charger requirement |
|---|---|---|---|---|
| AGM (12V) | ~12.6V | ~12.8V | Heavier | Standard AGM/lead-acid profile |
| LiFePO4 (12V) | ~13.2V | approximately 13.2 volts | significantly lighter | Lithium-specific profile required |
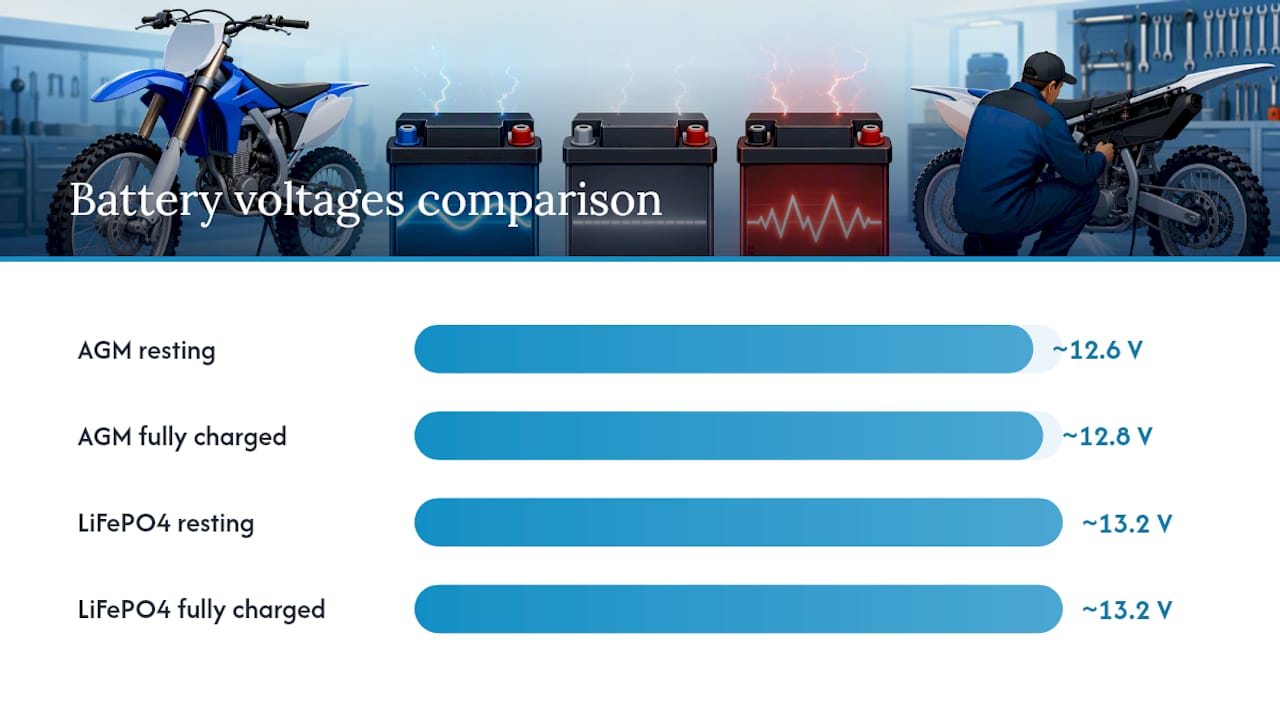
According to Dirt Action’s installation guide, a healthy 12V AGM battery reads approximately 12.8V at rest and around 13.2V when fully charged.
Wet-cell batteries only: If your replacement is a conventional wet-cell type (rare on modern dirt bikes), fill each cell to the indicated level with distilled water, then charge fully before installation. Never install a dry, uncharged wet-cell battery.
Pro Tip: Charge and load-test the new battery before installing it. A battery can show a normal resting voltage and still fail under cranking load. Catching a weak cell now saves you from pulling the whole assembly apart again at the trailhead.
How to install the new battery correctly
Install the battery in its tray, connect positive first, then negative last.
- Lower the new battery into the tray, keeping it level. Orient it so the positive terminal aligns with the red cable and the negative with the black.
- Reinsert the hold-down bracket, strap, or bolt. Snug it down enough to prevent movement but not so tight that it deforms the battery case.
- If you are using lead-nuts, slip the vinyl tubing trick onto the stud to hold the nut while you position the cable lug.
- Attach the positive (red) cable first. Thread the bolt by hand, then tighten with your socket. Terminal bolts on most dirt bikes torque to roughly 4–6 Nm; check your service manual for the exact spec. Overtightening strips the lead post or cracks the terminal.
- Apply a thin coat of dielectric grease to the positive terminal connection. This seals out moisture and slows corrosion.
- Attach the negative (black) cable last. Tighten to the same torque spec and apply dielectric grease.
- Fit terminal boots or rubber covers if your bike uses them.
Securing the battery for off-road use:
- Factory hold-downs are designed for the OEM battery size. If your replacement is smaller, add foam shims before tightening the strap.
- Route cables away from hot engine components and sharp edges. Use zip ties to secure any slack.
- Give each cable a gentle tug after tightening to confirm the connection is solid.
For a detailed walkthrough of correct terminal hardware and charger pairing, Bansheebatteries’ installation guide is worth bookmarking.
Pro Tip: Never use a longer bolt than the original on a terminal post. A bolt that bottoms out before clamping the lug will feel tight but leave the connection loose. Match the original bolt length exactly.
How do you test the electrical system after installation?
Turn the key on before you hit the starter. Watch for the dash lights and indicators to illuminate normally. A dead dash means a loose connection or a blown fuse, not necessarily a bad battery.
Multimeter tests to run:
- Resting voltage: With the key off, probe the battery terminals. A healthy 12V AGM should read at or above 12.6V; a LiFePO4 should read around 13.2V or higher.
- Crank voltage: Have a helper hit the starter while you watch the multimeter. Voltage should not drop below approximately 9.5V during cranking. A deeper drop points to a weak battery or poor terminal contact.
- Charging voltage at idle: Start the bike and probe the battery terminals. You should see voltage rise above resting.
- Charging voltage at higher revs: Rev to approximately 5,000 rpm. The charging system should push 13.5–14.8V at that range. Below 13.5V suggests a stator or regulator/rectifier issue.
| Test | Expected result | What a bad result usually means |
|---|---|---|
| Resting voltage (AGM) | ≥12.6V | Discharged or failing battery |
| Resting voltage (LiFePO4) | ≥13.2V | Discharged or BMS fault |
| Crank voltage drop | ≥9.5V | Weak battery or poor terminal contact |
| Charging at idle | Above resting voltage | Stator or regulator issue |
| Charging at ~5,000 rpm | 13.5–14.8V | Stator or regulator/rectifier fault |
Troubleshooting common problems:
- No power at all: Check the main fuse first. Then check both terminal connections for tightness.
- Clicking starter, no crank: Usually low cranking amps or a loose negative connection. Re-torque both terminals and retest.
- Low charging voltage at all revs: The stator or regulator/rectifier needs attention. Do not continue riding; a failing charging system will drain even a new battery.
- Burnt wiring smell: Stop immediately. Disconnect the negative terminal and inspect for reversed polarity or a pinched cable. This is a shop visit.
How to secure the battery against off-road vibration
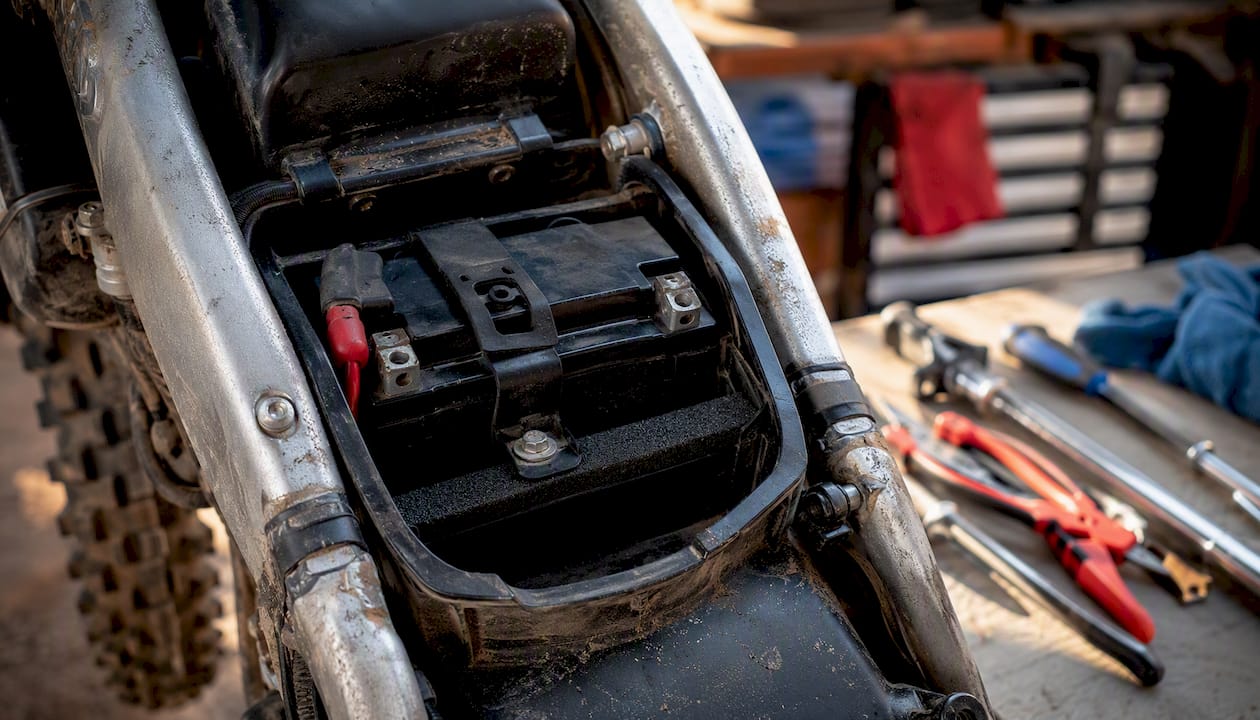
Solid mounting and foam isolation are the two things that protect a battery on a dirt bike. A battery that shifts even a few millimeters under hard landings will stress the terminal connections and eventually crack the case.
Mounting and isolation checklist:
- Use the factory hold-down bracket or strap whenever possible; it is sized for the OEM battery and distributes load evenly
- For lithium batteries that are smaller than the OEM unit, cut closed-cell foam strips to fill any gap on all four sides before tightening the strap
- Rubber strips between the battery and tray floor absorb vibration without conducting electricity
- Avoid conductive shims (metal strips, foil tape) between the battery and tray; they can create an unintended ground path
- Do not compress the battery case with the hold-down; snug is enough
- Route cables with enough slack to flex over bumps but not so much that they flap against hot or sharp surfaces
- Check terminal tightness after the first ride and again after the first hard session
If you are running a portable power station or field charger at camp, products like those from myCOOLMAN pair well with a smart maintainer setup for keeping your battery topped off between rides.
Routine maintenance, storage, and responsible disposal
Keep the battery on a smart maintainer when the bike sits for more than two weeks. A lead-acid or AGM battery left at partial charge sulfates over time, permanently reducing capacity. LiFePO4 batteries are more tolerant of storage but still benefit from a periodic top-up charge.
Storage tips:
- Store AGM batteries at or above 12.6V; check voltage every four to six weeks during long off-seasons
- LiFePO4 batteries can be stored at a partial state of charge (around 50–60%) for extended periods without damage
- Keep batteries in a cool, dry location; extreme heat accelerates self-discharge and degrades cells
- A lithium-compatible smart charger set to its maintenance or float mode is the lowest-effort way to protect battery life through winter
Disposal and recycling:
- Lead-acid and AGM batteries are classified as hazardous waste. Do not put them in household trash or recycling bins.
- Most auto parts stores, battery retailers, and municipal hazardous waste facilities accept used lead-acid batteries at no charge
- For lithium batteries, check with your local hazardous waste program; many areas now have dedicated lithium drop-off points
- Before transporting a damaged or swollen battery, tape the terminals with electrical tape to prevent accidental shorting in transit
Why chemistry and warranty matter: Bansheebatteries’ product guidance
LiFePO4 is the chemistry most powersports riders are moving toward for good reason. It is significantly lighter than AGM, holds a charge longer in storage, and typically lasts more charge cycles before capacity degrades. For off-road use, the weight savings translate directly to handling. The catch is charger compatibility: a charger running an AGM profile on a LiFePO4 cell can damage the battery management system (BMS) and void the warranty. This is not a minor footnote; it is the most common avoidable failure mode for lithium powersports batteries.
AGM remains a strong choice when you want a battery that tolerates a wider range of chargers, delivers high cold-cranking amps reliably, and costs less upfront. For bikes that sit in a garage with an existing AGM-profile maintainer, swapping to AGM is the lower-risk path.
What to look for when buying:
- Vehicle-specific fitment confirmation (length, width, height, terminal side)
- Warranty duration: Bansheebatteries backs its AGM batteries with a 4-year warranty and its lithium marine batteries with a 5-year warranty
- Charger pairing guidance included with the product
- A fitment tool that lets you search by year, make, and model
Bansheebatteries provides all of this through its product pages and fitment tool, with separate charger recommendations for AGM and LiFePO4 chemistries. Matching the charger profile to the battery chemistry is one of the highest-return maintenance steps you can take to protect both the battery and the warranty. Their how-to-choose guide walks through sizing and fitment checks in detail.
One thing most installers skip
Keep a small parts tray next to the bike the entire time you work. Every lead-nut, every panel clip, every small bolt goes in that tray the moment it comes off the bike. Sounds obvious. Most people skip it, lose a lead-nut into the subframe, and spend twenty minutes with a flashlight and a magnet before the battery is even in.
The one trick that actually saves time: before you lower the new battery into the tray, slip a short piece of vinyl tubing over each terminal stud. It holds the lead-nut at the right height while you position the battery and thread the cable lug. Without it, the nut drops every time the battery tilts.
Bansheebatteries has the right battery and charger for your bike
If you have followed this guide and you need a plug-and-play replacement, Bansheebatteries takes the guesswork out of fitment. Their vehicle-specific search tool matches your year, make, and model to a compatible AGM or LiFePO4 battery, and every listing includes the correct charger pairing so you do not accidentally run the wrong charge profile.
Their LiFePO4 powersports batteries are built for the vibration and temperature swings that come with off-road riding, and the 4-year AGM warranty and 5-year lithium marine warranty back that up with real coverage. For a chemistry-matched charger, the Bansheebatteries lithium charger is designed specifically for LiFePO4 profiles. Head to Bansheebatteries to find your fitment and place an order.
Sources
- How to remove and install a motorcycle battery - RevZilla
- How to install a new battery in your dirt bike | Dirt Action