


How to Fix Battery Terminal Corrosion (and Know When to Replace)
Most battery terminal corrosion is fixed by disconnecting the battery, neutralizing the buildup with a baking-soda solution on lead-acid batteries or vinegar on alkaline leaks, scrubbing the metal bare, drying it completely, and coating the terminals with a protectant before reconnecting. That fix takes 20 to 30 minutes and costs less than $10 in supplies.
Before you grab a wire brush, run through this quick decision tree. Corrosion is a symptom, not always the disease, and a few signs tell you whether cleaning solves the problem or indicates the need for eventual battery replacement.
- Lead-acid battery (car, motorcycle, marine): mix baking soda with water, apply until the fizzing stops, then rinse and dry.
- Alkaline cells in a remote or flashlight: use white vinegar or lemon juice on a cotton swab, never baking soda.
- Safety first: shut off the engine, pull the key, and disconnect the negative terminal before touching anything.
- Skip cleaning and replace instead if you see: a bulging or cracked case, deep pitting that’s eaten into the metal post, or active fluid leaking from the battery body.
Quick fact: even a thin layer of terminal corrosion raises electrical resistance enough to cause slow cranking or dim headlights, well before the buildup looks serious to the eye.
Key Takeaways
A battery terminal corrosion fix works when you neutralize the right chemical, scrub to bare metal, dry completely, and protect the connection before problems recur.
| Point | Details |
|---|---|
| Match the neutralizer to the chemistry | Use baking soda solution for lead-acid buildup and vinegar or lemon juice for alkaline leaks. |
| Disconnect negative first, reconnect positive first | This order minimizes spark risk and is the safest sequence for any lead-acid battery. |
| Bright metal is the real goal | Scrub until the post and clamp show clean, bare metal, not just cleared-off powder. |
| Watch voltage after reconnecting | Resting voltage should read 12.6 to 12.8 volts, and charging voltage should hold 13.8 to 14.6 volts. |
| Replace instead of clean when age or damage shows | Bulging cases, cracked posts, and batteries over 3 to 4 years old often justify a Banshee Batteries AGM or LiFePO4 replacement rather than another cleaning cycle. |
Table of Contents
- Tools, Supplies, and a Safety Checklist Before You Start
- How to Clean Corroded Battery Terminals on a Car, Truck, or Boat
- Cleaning Corroded Battery Compartments in Small Devices
- When Should You Repair vs. Replace Terminals and Cables?
- Confirming the Fix: Voltage Checks That Catch Recurring Problems
- Preventing Corrosion From Coming Back
- What Banshee Batteries Recommends for Long-Term Maintenance
- Sources
Tools, Supplies, and a Safety Checklist Before You Start
Rushing this job with bare hands and a butter knife is how people end up with acid burns or a wrecked alternator. Give yourself five minutes to gather the right gear first.
Personal protective equipment:
- Nitrile gloves (battery acid on skin needs to be rinsed immediately with water).
- Safety glasses or goggles, since scrubbing dried corrosion tends to flake bits upward.
- A respirator or at least good ventilation if you’re working in a closed garage, since batteries can vent hydrogen gas.
Supplies worth having on the bench:
- Baking soda and distilled water for lead-acid neutralizing.
- White vinegar for alkaline leaks.
- A dedicated battery terminal brush (the double-ended wire kind), plus an old toothbrush for tight spots.
- A properly sized wrench for your clamp bolts, penetrating oil for anything seized, clean rags, dielectric grease, and felt anti-corrosion washers.
- A memory saver or a 9V battery adapter if you want to keep your radio presets and clock settings intact.
Safety comes down to sequence and awareness. Turn the engine off, remove the key, and work in a ventilated space, ideally with the hood up and no open flame nearby. Disconnect the negative terminal first, always, because that breaks the circuit’s path to ground and dramatically lowers your risk of a spark if a wrench brushes metal. Never let a wrench or tool bridge both terminals at once, and keep loose jewelry off your hands and wrists while you work. If any solution splashes on skin, flush with water right away; if it reaches your eyes, rinse for several minutes and seek medical attention.
Pro Tip: Keep a second wrench in your other hand to hold the bolt head steady while you loosen the nut. Corroded clamps love to spin the whole bolt assembly, and that trick saves you from stripping it.

How to Clean Corroded Battery Terminals on a Car, Truck, or Boat
This is the core battery terminal corrosion fix most DIY owners come looking for, and it applies to standard flooded lead-acid batteries in cars, trucks, and most marine setups. AGM batteries follow the same steps, though they tend to need it far less often.
Step 1: Disconnect in the right order. Loosen the negative (black, marked with a minus sign) clamp first and move the cable away from the terminal so it can’t accidentally touch it again. Then loosen and remove the positive (red) clamp. If you’re using a memory saver, plug it in before you disconnect anything. Tuck both cables away from the battery body so they can’t swing back and make contact while you scrub.
Step 2: Mix and apply your neutralizer. A baking soda solution neutralizes the sulfuric acid that causes most of this white or bluish crust. A rough ratio of one tablespoon of baking soda per cup of water works well. Pour or brush it directly onto the corroded areas, the clamps, and the exposed post. You’ll see it fizz almost immediately. That reaction is the acid being neutralized in real time, and it’s a good sign, not something to wipe away in a panic. Keep applying until the fizzing stops on its own.
Step 3: Scrub until the metal is bright. A dedicated battery terminal brush handles the post and the inside of the clamp efficiently, since it’s shaped to fit both. An old toothbrush gets into tighter crevices around the base of the post. For heavier, crusted buildup, a small wire brush or fine steel wool works, but go easy on lead posts since they’re softer than you’d expect and gouge more easily than steel. The goal isn’t just knocking off the powdery crust. You’re scrubbing until you see bright, bare metal on both the post and the inside of the clamp, because that’s the actual contact surface carrying current.
If a clamp bolt is seized from corrosion welding it in place, a few drops of penetrating oil and a five-minute wait usually frees it without forcing anything. Forcing a stuck bolt is how battery posts crack, and a cracked post means a new battery, not a cleaning job.
Step 4: Rinse and dry completely. Rinse with a small, controlled amount of water, directing it downward and away from other engine components rather than spraying the whole area. You don’t need a hose blast, just enough to carry the neutralized residue off the metal. Dry thoroughly with a clean rag, and a quick pass of compressed air into the crevices around the post speeds things up and gets moisture out of spots a rag can’t reach. Any water left sitting on the terminals just becomes tomorrow’s corrosion starter.
Step 5: Reconnect and torque correctly. Reconnect the positive terminal first, then the negative, which is the reverse of how you disconnected. Tighten each clamp until it can’t be wiggled or twisted by hand. That’s the target, not white-knuckle torque. Battery posts, especially on lead-acid batteries, crack under too much force, and a quarter turn past snug with a wrench is typically plenty.
Step 6: Verify with a voltage check. Once everything’s reconnected, a multimeter tells you immediately whether the cleaning job actually worked:
- Resting voltage (engine off, battery settled): 12.6 to 12.8 volts on a fully charged battery.
- Running voltage (engine on): 13.8 to 14.6 volts, which confirms the alternator is charging correctly.
- Cranking voltage (during startup): should stay above roughly 9.6 volts; anything that dips lower under load points to a weak battery or a connection that’s still resisting current flow.
If your readings look normal and the engine starts crisply, the fix held. If cranking still feels sluggish after a clean, bright connection, the problem has moved past the terminals.
Cleaning Corroded Battery Compartments in Small Devices
Remote controls, flashlights, smoke detectors, and kids’ toys corrode differently than car batteries, and they call for a gentler touch. Alkaline cells leak potassium hydroxide, which is a different chemical than the sulfuric acid in your car battery, and vinegar or lemon juice neutralizes it far more effectively than baking soda.
- Remove the batteries as soon as you notice the crusty white or greenish buildup, wearing gloves since the residue is caustic and irritates skin.
- Dip a cotton swab in vinegar or lemon juice and dab it directly onto the corroded contacts. You’ll see a light fizz, similar to the baking soda reaction in a car battery, confirming the acid to alkaline mismatch is being handled correctly.
- Scrub gently with the swab or a fine emery board for stubborn spots. Skip wire brushes and steel wool here. The spring contacts inside small devices are thin metal, and aggressive scrubbing bends or snaps them.
- Let everything air-dry fully before reinstalling batteries. Trapped moisture inside a battery compartment is a fast track to round two.
Corrosion that has crept onto the circuit board itself needs more care than the contacts. A cotton swab barely dampened with isopropyl alcohol lifts residue off a PCB without risking a short, but don’t soak it and never spray liquid directly onto the board. If the contact springs themselves are pitted, bent out of shape, or crumbling at the touch, replacing them is usually a better bet than trying to clean around damage that’s already changed their shape. Small tension springs are cheap and available from most electronics parts suppliers.
Pro Tip: If a remote or flashlight has sat corroded for months and the plastic housing feels brittle or the contacts have visibly eaten into the plastic, don’t sink more time into it. Recycle the device at an electronics take-back point and put your effort into something worth saving.
Reassemble and test the device once everything’s dry. If it doesn’t power on, check that the springs are making firm contact with fresh batteries before assuming the device itself has failed.
When Should You Repair vs. Replace Terminals and Cables?
Cleaning restores conductivity, but it can’t undo structural damage. A few visual and physical checks tell you which side of that line you’re on.
Look closely at the post and clamp for deep pitting that’s carved actual craters into the metal rather than just surface discoloration, flaking or crumbling metal that comes off when you scrub instead of cleaning up bright, and cracked or split posts, which are a hard stop no matter how clean the rest of the connection looks. A swollen or bulging battery case means internal gas pressure has built up, usually from age, overcharging, or freeze damage, and that battery needs replacing regardless of how the terminals look. Cracked or brittle cable insulation near the clamps, especially if you can see bare copper strands, is a fire and short-circuit risk that cleaning does nothing to fix.
Beyond the visual check, two hands-on tests catch problems eyes miss:
- Wiggle the clamp after reconnecting and tightening. Any movement means the connection isn’t solid, even if it looked clean going in.
- Check for a voltage drop under load. A drop of more than 0.1 volt across a supposedly clean connection points to hidden resistance, often from corrosion that’s crept inside the cable strands where you can’t see it.
If the terminal itself is damaged but the battery is otherwise healthy, a terminal repair kit, essentially a new clamp end that crimps or solders onto the existing cable, runs $10 to $20 and takes about the same time as the cleaning job itself. If the battery is the actual problem, replacement costs for lead-acid batteries generally run between $150 and $390 depending on the vehicle and battery type, which is worth knowing before you spend another weekend re-cleaning a battery that’s already circling the drain. Take a dead or dying lead-acid battery to an auto parts store or recycling center rather than tossing it in household trash. Lead and sulfuric acid are both regulated as hazardous waste, and most retailers take old batteries for free.
If your inspection turns up any of these red flags rather than simple surface corrosion, our guide to spotting a battery that needs replacing walks through the full list of warning signs in more depth.
Confirming the Fix: Voltage Checks That Catch Recurring Problems
A clean terminal that immediately starts corroding again isn’t a cleaning failure. It’s usually a charging system telling you something. After any cleaning job, run these checks with the engine off and again with it running.
- Resting voltage: 12.6 to 12.8 volts indicates a fully charged battery; anything closer to 12.0 volts suggests it’s been running low, which accelerates plate degradation over time.
- Charging voltage: 13.8 to 14.6 volts with the engine running confirms the alternator and voltage regulator are doing their job correctly.
- Cranking voltage: should hold above roughly 9.6 volts during startup; a deep dip below that points to either a weak battery or resistance somewhere in the circuit that cleaning alone won’t fix.
Pay attention to which terminal keeps corroding, because that pattern is diagnostic. Heavy buildup concentrated on the positive terminal usually points to overcharging, since excess voltage from a bad regulator forces more gassing and pushes acid vapor up around that post. Corrosion that keeps coming back on the negative side more often points to undercharging, frequent short trips that never fully recharge the battery, or a parasitic drain slowly discharging it between drives. If cleaning solves the problem for a week and then it’s back, get the charging system tested at a parts store or with a multimeter before you assume the battery itself is at fault.
Preventing Corrosion From Coming Back
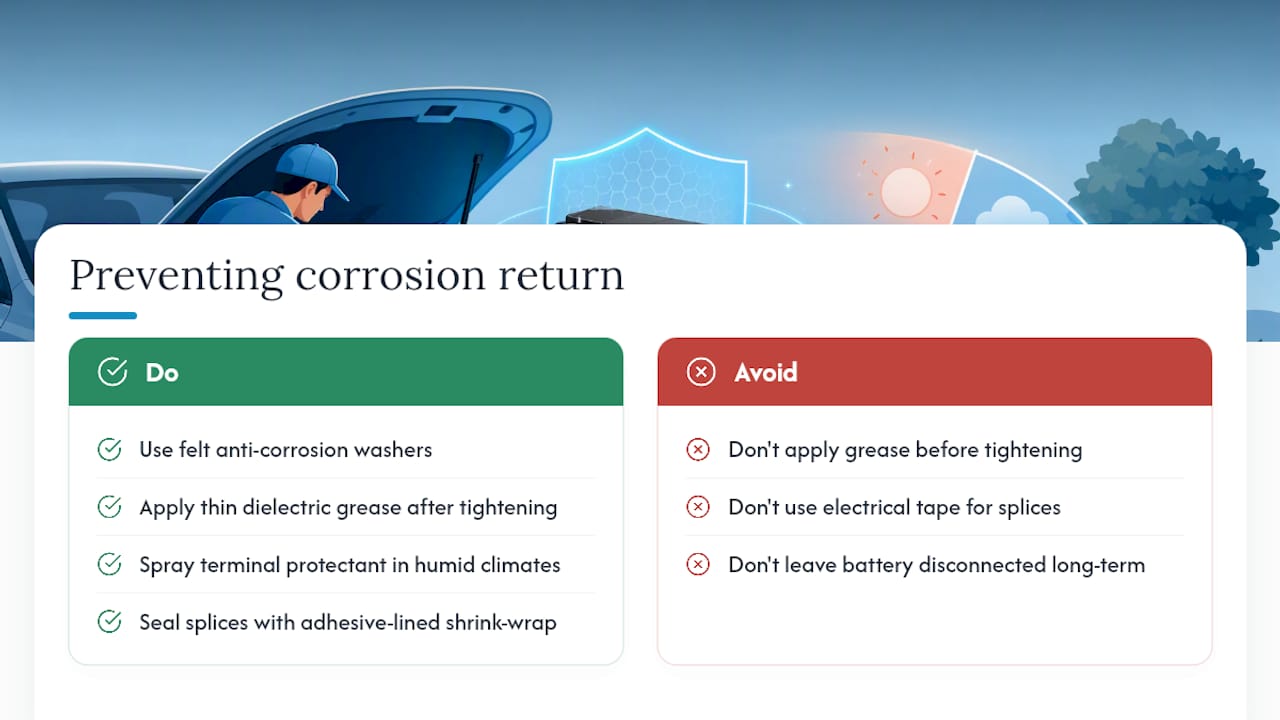
A clean terminal that gets no protection is just a corrosion problem on a delay. A few cheap, five-minute habits keep it from returning.
Felt anti-corrosion washers, the red and green fiber rings sold at any auto parts counter, sit under the clamp and absorb acid vapor before it reaches bare metal. Dielectric grease applied in a thin layer over the finished, tightened connection blocks moisture and oxygen without interfering with conductivity, since it only coats the exposed metal around the contact point rather than the contact surface itself. Terminal protectant sprays work similarly and are worth using on top of grease in humid climates or for vehicles that sit outside year-round.
Marine and other harsh-environment setups need a step up from standard automotive parts. Tinned marine-grade wire resists the accelerated corrosion that salt air and moisture cause far better than bare copper, and using the correct wire gauge for your amperage draw prevents overheating that can also degrade connections over time. Seal any exposed splice with adhesive-lined shrink-wrap rather than electrical tape, which degrades and lets moisture in within a season or two. Route cables away from the bilge whenever the boat’s layout allows it, since standing bilge water is one of the fastest ways to destroy an otherwise solid connection.
Build a simple habit around checking the terminals every three to six months, longer if the vehicle sits in a garage, shorter if it lives outdoors near the coast or gets heavy winter road salt exposure. If you’re storing a motorcycle, boat, or seasonal vehicle for months at a time, pairing that inspection cadence with a smart charger that maintains float voltage rather than letting the battery sit fully disconnected does more for corrosion prevention than any spray or grease alone, since a battery that’s neither overcharged nor deeply discharged simply outgasses less.
Pro Tip: Apply dielectric grease after you’ve finished tightening the clamp, not before. Grease under the clamp before you tighten it can act as an insulator and create the exact resistance problem you’re trying to prevent.
If you’re parking a bike or ATV for the off-season, our guide to preventing battery drain during storage covers the charger settings and storage habits that pair well with this prevention routine.
What Banshee Batteries Recommends for Long-Term Maintenance
Battery chemistry changes how often you’ll deal with this problem in the first place, and that’s worth knowing before you assume every battery needs the same maintenance schedule.
- AGM batteries are sealed and vent far less gas than flooded lead-acid designs, which means less acid vapor reaching the terminals and noticeably less corrosion over the battery’s life. Banshee backs its AGM lineup with a 4-year warranty, reflecting how much more stable these sealed designs are compared to older flooded designs.
- Lithium (LiFePO4) batteries don’t produce the sulfuric acid gassing that causes classic white or blue terminal crust at all, so corrosion on a LiFePO4 terminal usually points to moisture, road salt, or a loose connection rather than the battery chemistry itself. Banshee’s marine lithium batteries carry a 5-year warranty.
- If you’re maintaining an AGM battery specifically, our full AGM maintenance guide covers charging habits that extend service life well beyond the corrosion question.
- Choosing the right charger matters as much as choosing the right battery. A charger that overshoots voltage accelerates gassing and corrosion on flooded batteries and can shorten lithium battery life through improper charge cycling.
A Few Honest Notes From Working on These for Years
The most common mistake isn’t skipping the cleaning steps. It’s skipping the drying step and reconnecting a still-damp terminal, which brings corrosion back within days and convinces people the cleaning “didn’t work.” It worked. It just got no chance to stay clean.
The other habit worth building: stop re-cleaning a battery that’s already three or four years old and corroding every few weeks. At that point you’re maintaining a symptom, not solving a problem. Replace it and move on.
— Donald
Sometimes Cleaning Isn’t the Fix. A New Battery Is.
If your inspection turned up a cracked post, a swollen case, or a battery that’s simply too old to hold a charge no matter how bright those terminals look, cleaning was never going to solve it. Banshee Batteries builds AGM and LiFePO4 replacements specifically for powersports, marine, and RV use, backed by a 4-year warranty on AGM and a 5-year warranty on lithium marine batteries, so you’re not back under the hood scrubbing corrosion again next season.
If you’re outfitting a boat, the Lithium (LiFePO4) marine battery lineup is built to handle the moisture and vibration that wreck standard flooded batteries early. Riders replacing a bike or ATV battery can check the Banshee powersport lithium collection for a direct fit. And if a bad charger is part of why your terminals kept corroding in the first place, a fully automatic 12-volt charger with overcharge protection fixes the root cause instead of the symptom. Use Banshee’s battery finder tool to match the right model to your vehicle before you order.
Sources
- Car Battery Corrosion: How to Clean a Corroded Car Battery | AutoZone DIY
- Marine battery cables and terminals: controlling corrosion — EWCS Wire
- What causes car battery corrosion? Answers and prevention tips | Rick’s Free Auto Repair Advice